Essential Raspberry Pi Accessories Checklist for a First Setup
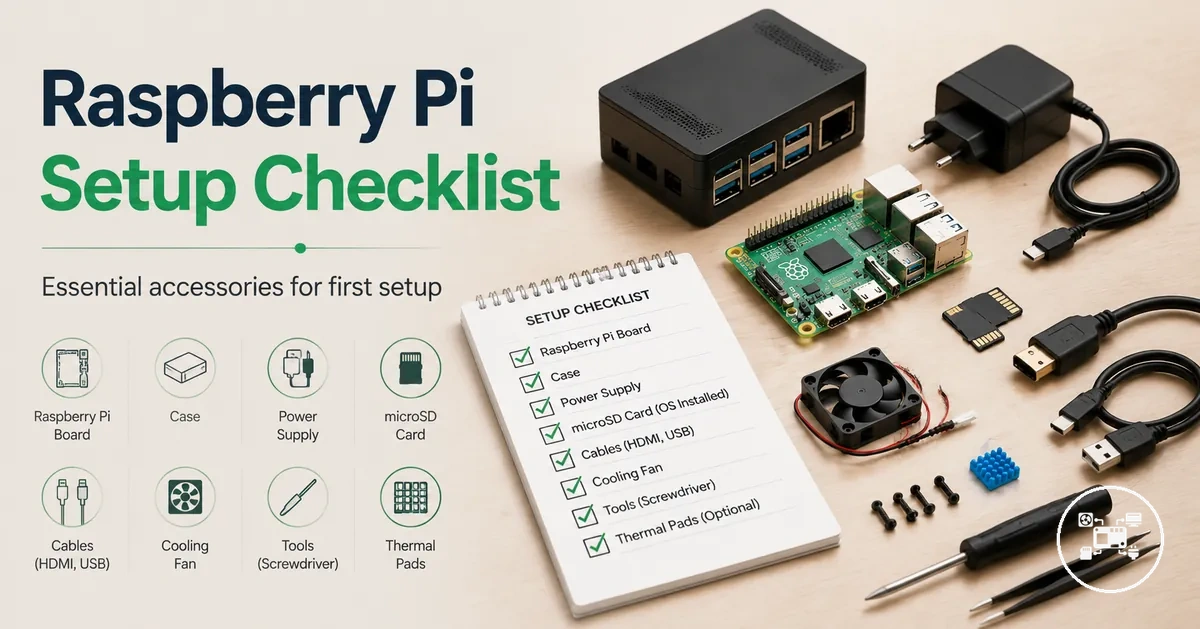
Raspberry Pi accessories are the hardware components required to power, boot, protect, and interact with a Raspberry Pi during a first setup. According to the Raspberry Pi Documentation, a basic setup consists of a compatible power supply, boot storage, a display connection, and input devices when using Raspberry Pi OS with a desktop environment. The accessory combination changes according to the Raspberry Pi model and project, so not every first setup requires the same add-ons. This checklist groups the essential accessory categories before narrowing them to board- and project-specific decisions.
The checklist below organizes the core Raspberry Pi accessories by their setup function rather than by product choice.
The checklist below organizes the core Raspberry Pi accessories by their setup function rather than by product choice.
- Power supply: Match the official voltage and current specification for your Raspberry Pi model. Raspberry Pi Ltd specifies a USB-C power supply rated at 5 V / 5 A for Raspberry Pi 5 and a USB-C power supply rated at 5.1 V / 3 A for Raspberry Pi 4 Model B.
- Storage: Most Raspberry Pi models boot from a microSD card, while Raspberry Pi 5 also supports NVMe SSD booting when used with a compatible M.2 HAT and current bootloader firmware, according to Raspberry Pi documentation.
- Case: Choose a case designed for the exact Raspberry Pi model so that mounting points, connectors, cooling paths, and GPIO access align correctly.
- Display connection: Select the correct HDMI cable type for the board. Raspberry Pi 4 and Raspberry Pi 5 use micro-HDMI outputs, whereas earlier full-size HDMI models require different cables.
- Keyboard and mouse: USB or supported Bluetooth input devices are recommended for a desktop installation but are unnecessary for many headless server deployments after initial configuration.
- Network connection: Use Gigabit Ethernet when a stable wired connection is preferred, or configure supported Wi-Fi on compatible Raspberry Pi models.
- Project-specific add-ons: Cooling solutions, camera modules, displays, HATs, GPIO accessories, sensors, or external storage should be selected only when the application requires those capabilities.
Choose Raspberry Pi accessories by matching the board model, operating environment, and project requirements rather than collecting every available add-on. For example, according to Raspberry Pi Ltd, a Raspberry Pi 5 desktop setup normally uses a 5 V / 5 A USB-C power supply, while a Raspberry Pi 4 Model B uses a 5.1 V / 3 A supply; using the correct specification helps maintain stable operation under load. A media center, home server, robotics project, or electronics prototype can each require different accessory combinations even when they use the same Raspberry Pi board.
Table of Contents
Essential Accessories Required for a Raspberry Pi Setup
Essential accessories for a functional Raspberry Pi setup fall into five categories: power, boot storage, board protection, display connection, and input. Power and boot storage are core requirements; a case, display cable, keyboard, and mouse are conditional requirements determined by the Raspberry Pi model and whether the system will run locally or headlessly. Raspberry Pi Documentation identifies boot media as non-volatile storage containing the operating-system image and describes a microSD card as the most common option.
The checklist groups each accessory category by its purpose and setup condition.
The checklist groups each accessory category by its purpose and setup condition.
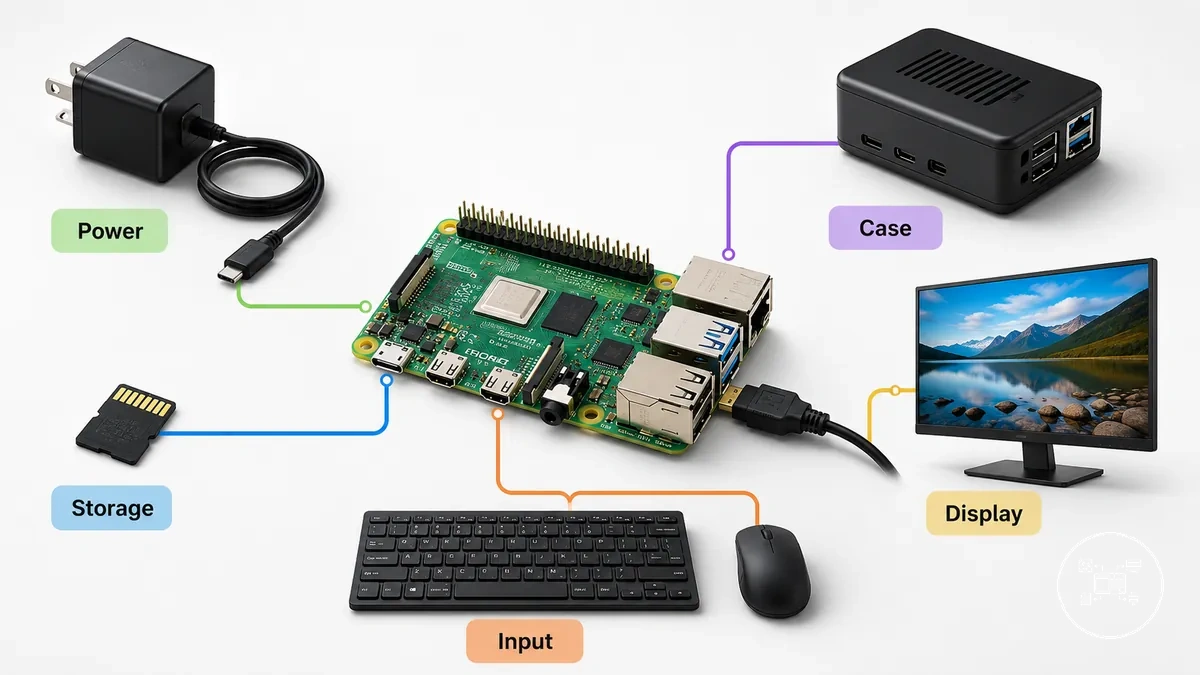
- Power: The power supply must match the board's specified input. Raspberry Pi Ltd specifies 5 V at 5 A, equivalent to 25 W, for Raspberry Pi 5; it also permits 5 V at 3 A, equivalent to 15 W, when the USB peripheral-current limit is 600 mA. Raspberry Pi 4 Model B requires 5 V at 3 A, equivalent to 15 W.
- Storage: Boot storage must contain an operating-system image. Raspberry Pi Documentation identifies microSD as the most common boot medium and states that supported newer models can also boot from USB mass storage, network storage, or NVMe storage through PCIe.
- Case: A case is optional for initial operation but should match the exact board model when protection is required, because the enclosure must preserve access to that model's power, display, USB, GPIO, and storage connections.
- Display connection: A display cable is required for a local graphical setup. Raspberry Pi Documentation specifies micro-HDMI-to-HDMI for Raspberry Pi 4B, 400, 5, 500, and 500+, and mini-HDMI-to-HDMI for Raspberry Pi Zero and Zero 2.
- Input: A keyboard and pointing device are required when the user controls a desktop interface locally. Raspberry Pi Documentation states that wired devices can use the board's USB ports, while Raspberry Pi Zero models require a micro-USB OTG adapter and may require a powered USB hub when connecting separate keyboard and mouse devices.
Required accessories therefore follow the setup condition: a local desktop needs power, boot storage, display, keyboard, and mouse, while a preconfigured headless system can operate without permanently attached display and input devices. For example, Raspberry Pi 5 with USB peripherals drawing more than the documented 600 mA limit requires the specified 5 V/5 A supply rather than the 5 V/3 A operating option. The Raspberry Pi accessories guide places these broad categories within the wider compatibility and project-selection context.
Power Supply and Connection Accessories for Raspberry Pi
Power supply and connection accessories determine whether a Raspberry Pi board receives stable power and reliable peripheral connections during operation. According to Raspberry Pi Ltd, the required voltage, current, and connector type depend on the Raspberry Pi model and connected USB devices. For example, Raspberry Pi 5 is specified for a 5 V, 5 A USB-C power supply, while Raspberry Pi 4 Model B requires a 5.1 V, 3 A USB-C power supply, making model-specific power selection an important reliability factor.
The checklist below summarises the main selection criteria.
The checklist below summarises the main selection criteria. For a more detailed evaluation of chargers, cables, and related hardware, see the power accessories for Raspberry Pi guide.
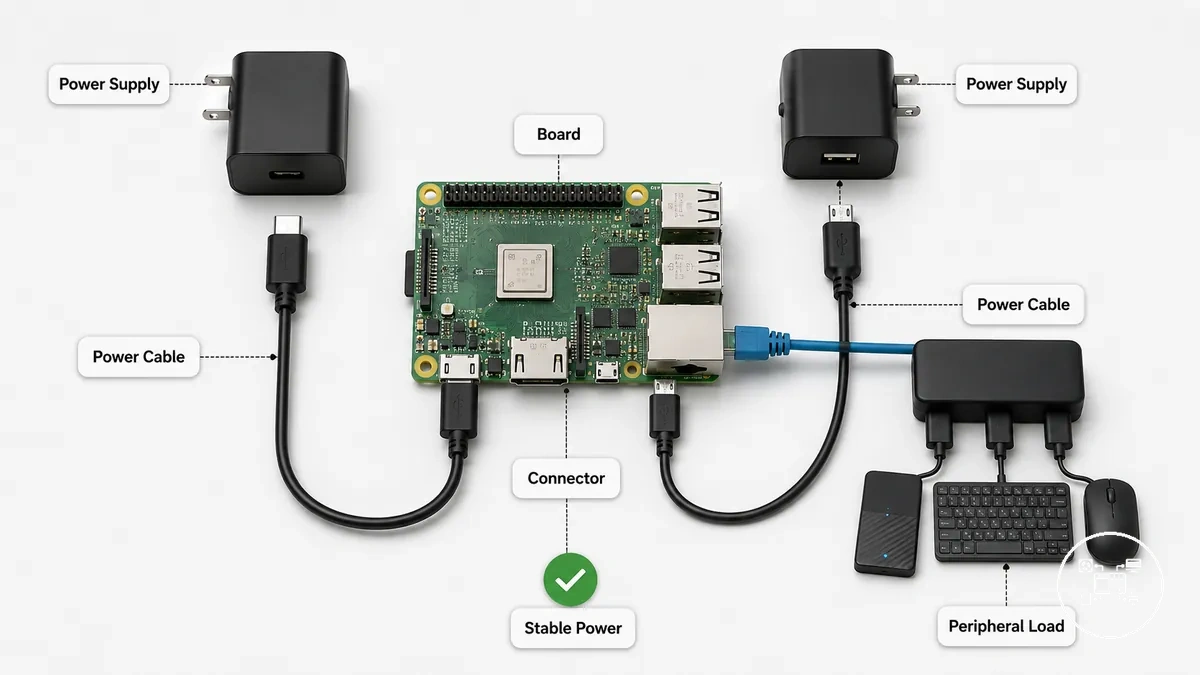
- Connector type: Match the connector to the Raspberry Pi board. Raspberry Pi Documentation specifies USB-C for Raspberry Pi 4 Model B and Raspberry Pi 5, while Raspberry Pi 3 Model B, Raspberry Pi 3 Model B+, Raspberry Pi Zero, and Raspberry Pi Zero 2 W use Micro-USB.
- Power capability: Select a power supply that meets the manufacturer's specified voltage and current for the board model. Higher USB peripheral loads increase current demand and may require the official higher-capacity power supply.
- Cable quality: Use a USB cable designed for reliable power delivery to minimise voltage drop, particularly with boards operating near their maximum current specification.
- Setup condition: Desktop systems using USB SSDs, cameras, or multiple peripherals generally require greater available USB power than lightly loaded headless systems.
Power accessory requirements therefore depend on both the Raspberry Pi model and the connected hardware rather than a universal specification. For example, Raspberry Pi Ltd states that Raspberry Pi 5 operating from a 5 V, 3 A supply limits default USB peripheral output to 600 mA, whereas the recommended 5 V, 5 A supply enables higher peripheral power availability. Matching the connector type and power specification to the intended workload helps reduce undervoltage events and improves overall system stability.
Cases and Cooling Accessories for Raspberry Pi Protection
Cases and cooling accessories should be selected according to the Raspberry Pi model, required board protection, airflow, and expected workload rather than assuming every setup needs active cooling. According to Raspberry Pi Documentation, Raspberry Pi 5 supports both passive and active cooling, while sustained processor-intensive workloads benefit from additional thermal management to reduce thermal throttling. A correctly matched case also protects the board and maintains access to its ports, GPIO header, and mounting points.
A correctly matched case also protects the board and maintains access to its ports, GPIO header, and mounting points.
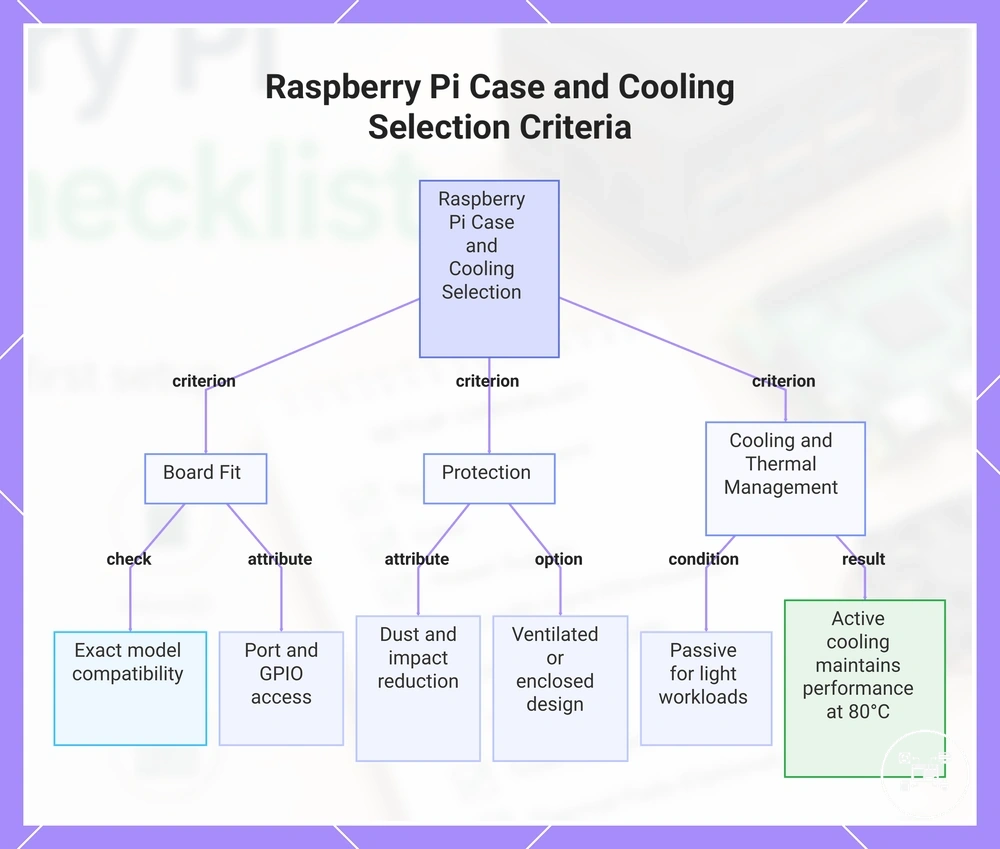
Evaluate the following criteria before selecting Raspberry Pi case accessories and cooling accessories for Raspberry Pi.
- Board fit: Select a case designed for the exact Raspberry Pi model so that USB, HDMI, GPIO, camera, and display connectors remain fully accessible.
- Protection: A protective enclosure helps reduce exposure to dust, accidental contact, and minor impacts during normal operation while supporting secure mounting.
- Airflow: Ventilated cases improve natural airflow, whereas enclosed designs prioritise physical protection and may require additional cooling during sustained high-load operation.
- Thermal support: Raspberry Pi Documentation states that Raspberry Pi 5 supports passive heatsinks as well as the official Active Cooler. Passive cooling is generally suitable for light desktop, educational, or automation workloads, while active cooling is intended for prolonged processor-intensive tasks.
Accessory priorities change with operating conditions rather than following a single recommendation. For example, according to Raspberry Pi Documentation, Raspberry Pi 5 begins reducing processor frequency when thermal limits are reached, with thermal throttling starting at approximately 80 °C; an active cooler helps maintain performance during sustained compilation, media processing, or similar continuous workloads. In contrast, a lightly loaded home automation system commonly benefits more from a correctly fitting protective case than from dedicated active cooling.
Accessory priorities change with operating conditions rather than following a single recommendation.
This chart shows the key criteria for selecting Raspberry Pi cases and cooling accessories, including board fit, protection, and cooling options based on workload.
Storage, Display, and Input Accessories for First Projects
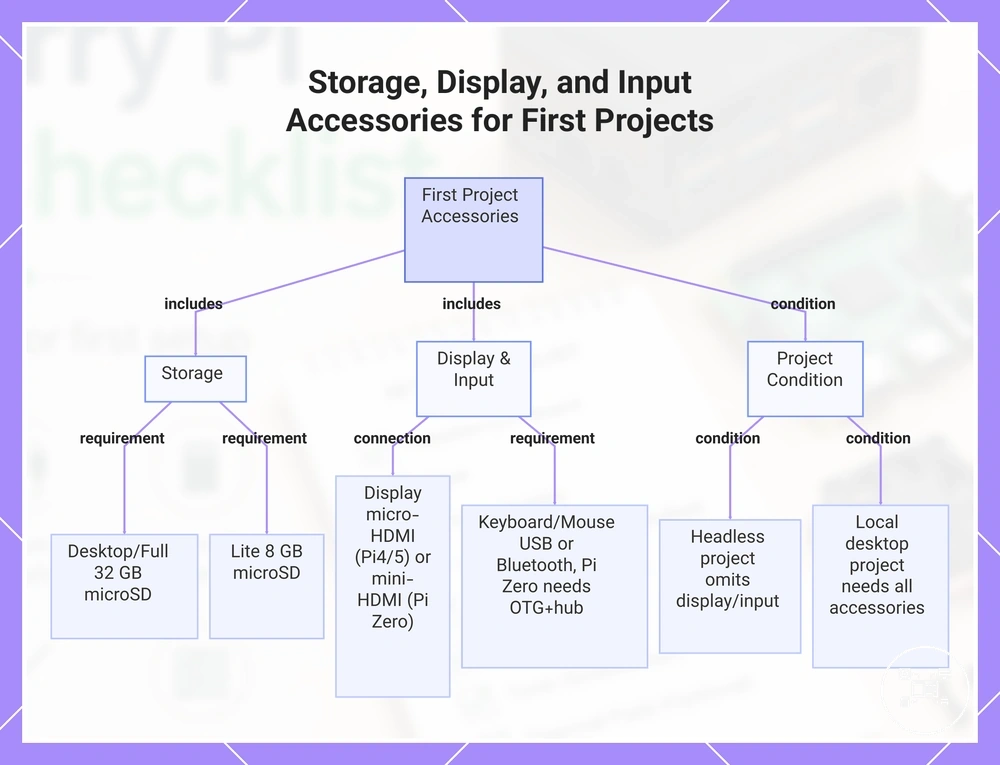
Storage, display, cable, and input accessories complete a Raspberry Pi project by providing boot capacity, visual output, and local control. Raspberry Pi Documentation recommends at least 32 GB of microSD storage for Raspberry Pi OS Desktop or Full and at least 8 GB for Raspberry Pi OS Lite; it supports SD cards with capacities below 2 TB. :contentReference[oaicite:0]{index=0} A display, keyboard, and mouse are conditional accessories because a remotely managed headless project can operate without permanently connected local controls.
The following categories connect each accessory type to its capacity, connection method, and project condition.
The following categories connect each accessory type to its capacity, connection method, and project condition.
- Storage: Use at least 32 GB for Raspberry Pi OS Desktop or Full and at least 8 GB for Raspberry Pi OS Lite, then allow additional capacity for project software and data. Raspberry Pi Documentation identifies microSD as the usual boot medium, while compatible configurations can also use USB mass storage or NVMe storage. :contentReference[oaicite:1]{index=1}
- Display: Add a monitor when the project requires a desktop, dashboard, media output, or local status view. Raspberry Pi Documentation specifies two micro-HDMI outputs on Raspberry Pi 4 Model B and Raspberry Pi 5, so either board can connect to as many as two HDMI displays when its supported display modes and cables are used. :contentReference[oaicite:2]{index=2}
- Cable: Match both cable ends to the board and display ports. Raspberry Pi 4 Model B and Raspberry Pi 5 use micro-HDMI outputs, while Raspberry Pi Zero models use mini-HDMI; the monitor end is commonly full-size HDMI. :contentReference[oaicite:3]{index=3}
- Keyboard and mouse: Use wired USB or supported Bluetooth input devices when the project requires local interaction. Raspberry Pi Documentation states that Raspberry Pi Zero models require a micro-USB OTG adapter and a powered USB hub when connecting separate keyboard and mouse devices because the board cannot supply enough power for both directly. :contentReference[oaicite:4]{index=4}
Project purpose determines which accessories provide functional value. For example, a local desktop project can use a 32 GB or larger microSD card, one display, a keyboard, and a mouse, whereas Raspberry Pi OS Lite can begin with an 8 GB card in a headless project whose software and data fit within the remaining capacity. :contentReference[oaicite:5]{index=5} An interactive dashboard needs display and input connections, while a remotely managed sensor or automation project can reserve its ports and physical space by omitting them after configuration.
Project purpose determines which accessories provide functional value.
This chart shows the storage capacity requirements, display and input connection methods, and project conditions for choosing Raspberry Pi accessories.
Accessory Compatibility Factors Before Choosing a Raspberry Pi Setup
Raspberry Pi accessory compatibility requires the accessory’s connector, interface, physical fit, and power demand to match the exact Raspberry Pi board and intended configuration. Raspberry Pi Documentation shows that board models use different power and display connections; Raspberry Pi 5 and Raspberry Pi 4 Model B use USB-C power and micro-HDMI display outputs, while Raspberry Pi Zero models use Micro-USB power and mini-HDMI display outputs. Compatibility with one Raspberry Pi model therefore does not establish compatibility with another.
Compatibility with one Raspberry Pi model therefore does not establish compatibility with another.
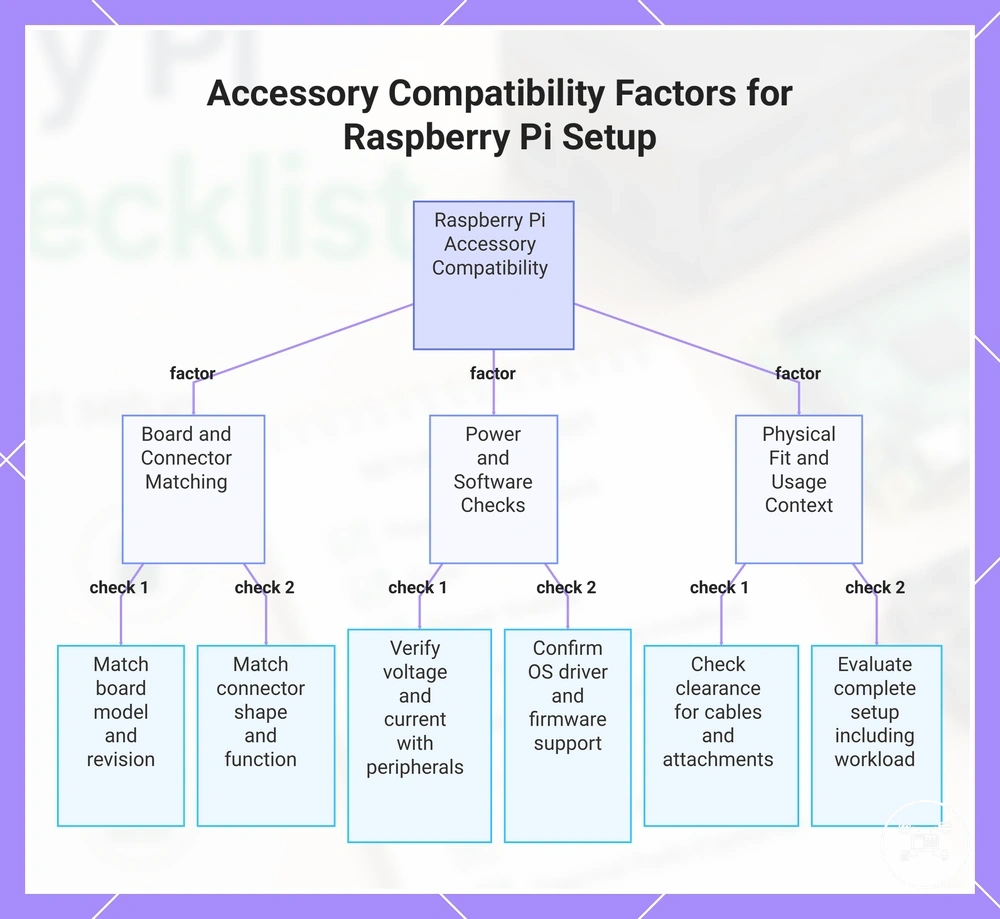
Use the criteria below to evaluate accessory fit and check accessory compatibility before selecting a setup.
- Board model and revision: Match the accessory to the complete Raspberry Pi model designation. A compatible case or mounting accessory must align with that board’s dimensions, mounting holes, ports, GPIO header, and camera or display connectors.
- Connector and interface: Match both the connector shape and its function. Raspberry Pi Documentation specifies micro-HDMI for Raspberry Pi 4 Model B and Raspberry Pi 5, mini-HDMI for Raspberry Pi Zero and Zero 2, and different camera or display connector formats across board generations.
- Physical fit: Confirm that the accessory leaves usable clearance around cables, heatsinks, fans, GPIO attachments, and adjacent ports. An electrically supported accessory is unsuitable when its enclosure or mounting position blocks the required connection.
- Power requirement: Match the board’s voltage and current specification and include the demand from connected peripherals. Raspberry Pi Ltd specifies 5 V at 5 A for the recommended Raspberry Pi 5 supply and 5 V at 3 A with a 600 mA USB peripheral limit as an alternative condition; Raspberry Pi 4 Model B is specified for 5 V at 3 A.
- Software support: Verify that the planned operating system provides the required driver, firmware, or control interface. A matching physical connector does not provide functional compatibility when the accessory lacks software support for that configuration.
- Usage condition: Evaluate the accessory inside the complete setup, including enclosure, cooling, cable routing, peripheral load, and intended workload.
Suitability is a board-accessory-configuration outcome rather than a universal accessory property. For example, according to Raspberry Pi Ltd, a 5 V, 3 A USB-C supply matches the documented Raspberry Pi 4 Model B requirement, but the same current rating places Raspberry Pi 5 under its 600 mA default USB peripheral limit instead of the higher peripheral-power condition available with a 5 V, 5 A supply. The final compatibility decision should therefore retain the exact board model, connected devices, enclosure, software, and workload as explicit conditions.
Suitability is a board-accessory-configuration outcome rather than a universal accessory property.
This chart shows the six key compatibility factors grouped into three categories: board and connector matching, power and software checks, and physical fit and usage context.
Choosing Between Raspberry Pi Starter Kits and Individual Accessories
Raspberry Pi starter kits and individual accessories differ in four main decision criteria: included components, purchasing flexibility, compatibility confidence, and project suitability. A starter kit bundles the hardware needed for a first Raspberry Pi setup, while individual accessories allow each component to be selected separately for a specific board and workload. According to Raspberry Pi Documentation, every Raspberry Pi setup still requires compatible power, boot storage, and the appropriate connection accessories regardless of the purchasing method.
Compare the criteria below before deciding between a kit or individual accessories purchasing path.
Compare the criteria below before deciding between a kit or individual accessories purchasing path.
| Option | Included components | Flexibility | Suitable use case |
|---|---|---|---|
| Starter kit | Usually includes a compatible power supply, microSD card, case, HDMI cable, and basic keyboard and mouse. Contents differ by manufacturer, so the included accessories should be confirmed before purchase. | Limited to the bundled components because accessories are preselected. | First-time Raspberry Pi users, education, and general desktop setups where convenience is the priority. |
| Individual accessories | Each accessory is purchased separately according to the Raspberry Pi model and project requirements. | Maximum configuration flexibility because storage, cooling, power, display, networking, and expansion hardware can be selected independently. | Custom electronics, robotics, media servers, home automation, industrial projects, or systems requiring specific hardware combinations. |
The appropriate purchasing path depends on the project objective rather than one option being universally superior. For example, according to Raspberry Pi Ltd, a Raspberry Pi 5 desktop setup requires a recommended 5 V, 5 A USB-C power supply; a starter kit may already include that component, while an individual purchase allows the same board to be paired with only the required accessories, such as an NVMe HAT and active cooler for sustained workloads. Choosing the option that matches the intended project reduces unnecessary purchases while keeping the accessory selection aligned with the Raspberry Pi board and application.
Project-Based Accessories That Expand a Raspberry Pi Setup
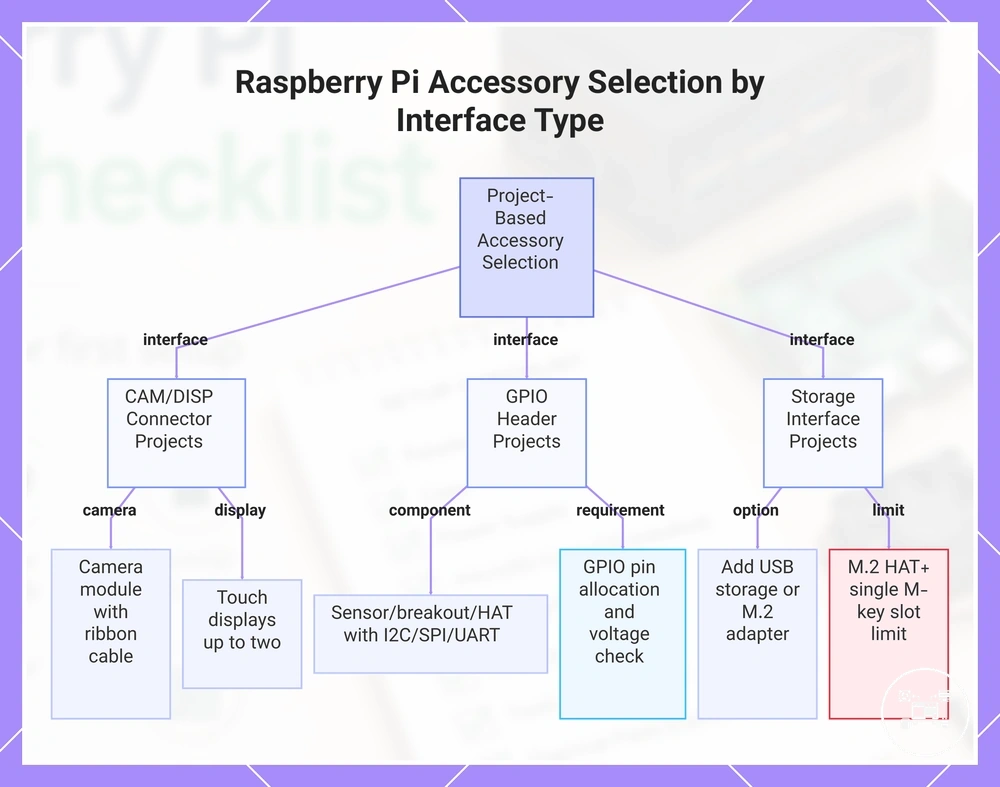
Project-based Raspberry Pi accessories should add a capability that the first functional setup does not provide, with each accessory choice matched to the project’s required interface, capacity, input, or output. Camera projects require a supported camera connection, storage projects require suitable media and an available storage interface, electronics projects require GPIO-compatible components, and interactive projects require a local display or control device. No single accessory set suits every project because the required capability and operating condition change with the intended use.
The scenarios below connect common first-project goals to specific accessory requirements and limitations.
The scenarios below connect common first-project goals to specific accessory requirements and limitations.
- Camera or vision project: Select a supported camera module and the ribbon cable required by the board connector. Raspberry Pi Documentation specifies two combined CAM/DISP connectors on Raspberry Pi 5, labelled CAM/DISP0 and CAM/DISP1, and states that either connector can support a camera; using one connector leaves the second available for another supported camera or display connection.
- Sensor or control project: Choose a sensor, breakout board, or HAT that uses the required I2C, SPI, UART, or digital input-output interface. Raspberry Pi Documentation specifies a 40-pin GPIO header with a 2.54 mm pin pitch on current Raspberry Pi boards, but the project must also allocate the correct pins and confirm the accessory’s voltage, software, and enclosure-clearance requirements.
- Storage project: Add USB storage or an M.2 adapter when the project requires capacity or an interface beyond its existing microSD setup. Raspberry Pi Documentation states that the Raspberry Pi M.2 HAT+ converts the Raspberry Pi 5 PCIe connector to one M.2 M-key connector, while official Raspberry Pi SSD capacities include 256 GB, 512 GB, and 1 TB; only one M.2 peripheral can occupy that connector at a time.
- Interactive project: Select a display, touchscreen, keyboard, mouse, or physical controls according to how the user must interact with the project. Raspberry Pi Documentation states that Raspberry Pi 5 can natively connect up to two Raspberry Pi Touch Displays when the appropriate 22-way-to-15-way cables are used, whereas a remotely managed project can omit permanently attached local input and display accessories.
Define the project’s required input, output, storage capacity, physical space, and operating duration before adding accessories. For example, a Raspberry Pi 5 monitoring project could use one of its two CAM/DISP connectors for a camera and preserve the other for a display, while a storage project using an M.2 HAT+ must treat its single M.2 M-key connector as an occupied expansion path. This project-first sequence keeps each accessory tied to a measurable capability or explicit condition without expanding the initial setup into unnecessary hardware.
Define the project’s required input, output, storage capacity, physical space, and operating duration before adding accessories.
This chart shows how to select project-based accessories for a Raspberry Pi setup based on the required interface (CAM/DISP, GPIO, or storage) and includes key requirements and limitations for each project type.