Raspberry Pi Display and Cable Accessories Guide
Raspberry Pi display and cable accessories are connection components that connect a Raspberry Pi board to a compatible screen through HDMI, micro HDMI, mini HDMI, or MIPI DSI interfaces. Compatibility has a conditional value: the board’s port type, the display’s input, and the cable or adapter connectors must form a matching connection path.
Compatibility has a conditional value: the board’s port type, the display’s input, and the cable or adapter connectors must form a matching connection path.
Raspberry Pi documentation specifies that Raspberry Pi 4B, 400, 5, 500, and 500+ require a micro-HDMI-to-HDMI cable for a standard HDMI monitor, while Raspberry Pi Zero and Zero 2 require a mini-HDMI-to-HDMI cable. This model-specific distinction means that a cable selected for a Raspberry Pi 5 does not provide the correct board-side connector for a Raspberry Pi Zero 2, even when both connect to the same HDMI display.
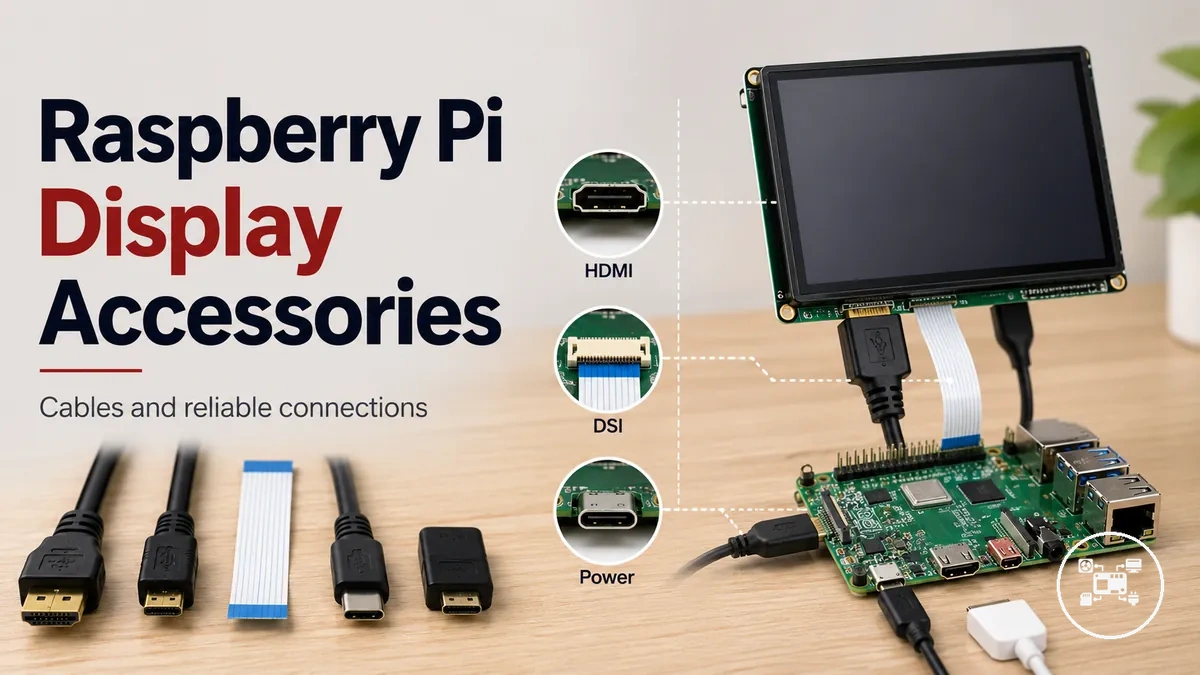
Raspberry Pi display accessories also include DSI-connected panels and their ribbon cables.
Raspberry Pi display accessories also include DSI-connected panels and their ribbon cables. Raspberry Pi Ltd. specifies that the Raspberry Pi Touch Display 2 has a 720 × 1280-pixel panel and uses two connections: GPIO power and a ribbon cable to the board’s DSI port; Raspberry Pi 5 requires a 22-way-to-15-way flat-flex cable for that connection. Users should therefore evaluate the Raspberry Pi model, board port, display interface, and required connectors before comparing display size, cable length, or accessory format.
Table of Contents
Raspberry Pi Display and Cable Accessories Overview
Raspberry Pi display accessories are components that connect a Raspberry Pi board to a display through compatible connectors, display interfaces, and cable types. They include a display accessory such as an HDMI cable, micro HDMI cable, display cable, or adapter cable that transfers video signals between a Raspberry Pi port and a compatible monitor or display module. According to Raspberry Pi Ltd., supported display interfaces include HDMI for external monitors and MIPI DSI for compatible touchscreen displays, while the required connector depends on the Raspberry Pi model. As a specialised category within Raspberry Pi accessories, these components are intended specifically for display connectivity rather than general expansion or peripheral functions.
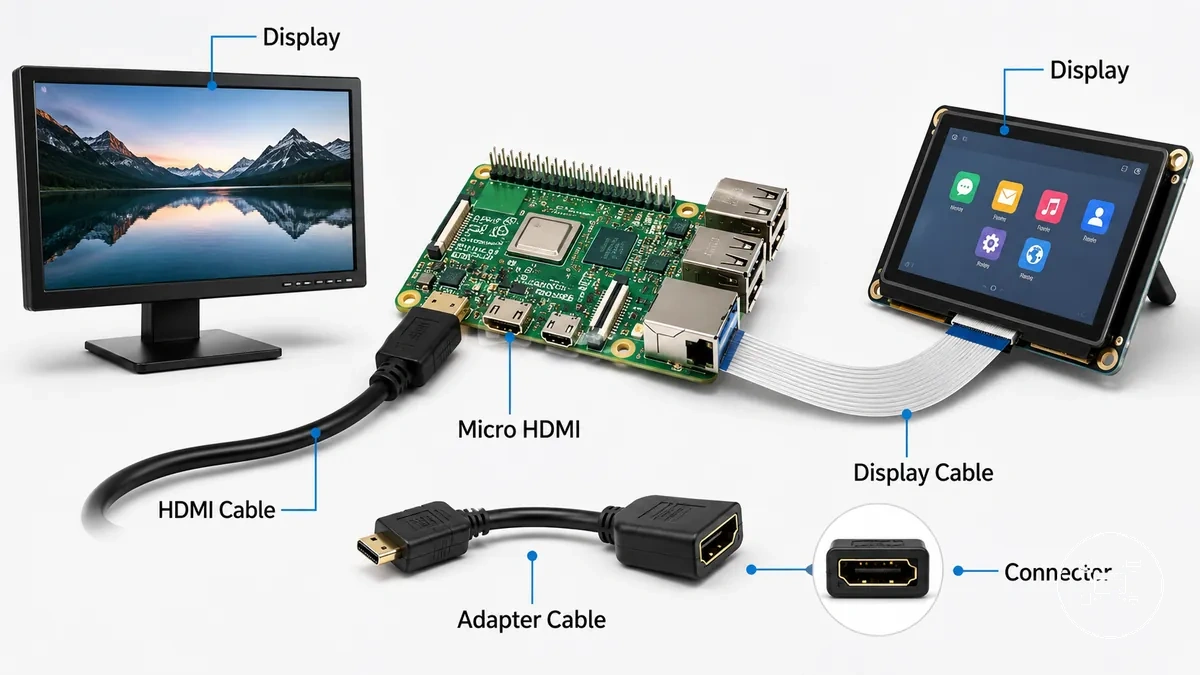
Display accessories establish the physical connection between the Raspberry Pi board and the display by matching the board's output port to the display's input connector. An HDMI cable connects boards with full-size HDMI ports, a micro HDMI cable connects models such as Raspberry Pi 4 and Raspberry Pi 5 that use micro HDMI outputs, and an adapter cable bridges different connector formats when required. For example, Raspberry Pi Ltd. specifies that Raspberry Pi Touch Display 2 provides a resolution of 720 × 1280 pixels and connects to Raspberry Pi 5 through a 22-way-to-15-way flat-flex cable, whereas earlier compatible boards use a 15-way-to-15-way cable. This illustrates that display compatibility depends on matching the connector type and board generation rather than assuming every display cable fits every Raspberry Pi model.
Raspberry Pi Display Types and Connection Options
Raspberry Pi display types are distinguished by their display type, connection interface, cable form, and connector requirements. According to Raspberry Pi Ltd., the primary connection categories are HDMI for external displays, MIPI DSI for compatible touchscreen displays, and GPIO-connected display modules for selected embedded applications. None of these interfaces is universally preferable because compatibility depends on the display's intended use and the Raspberry Pi board's available connector.
Raspberry Pi display types are distinguished by their display type , connection interface , cable form , and connector requirements.
The comparison below highlights the main connection options and the attributes users should evaluate before selecting a Raspberry Pi display accessory.
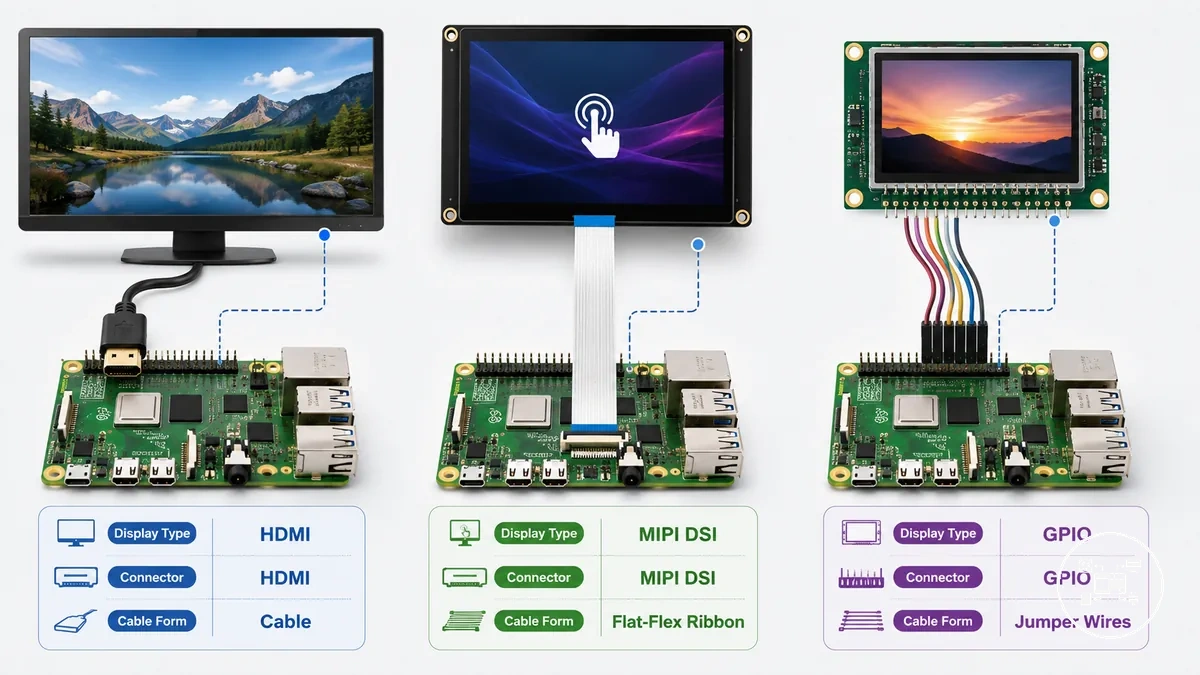
| Display type | Connection interface | Cable form | Connector requirement | Typical use case |
|---|---|---|---|---|
| External monitor or television | HDMI | HDMI-to-HDMI or micro HDMI-to-HDMI cable | Matching HDMI connector on the Raspberry Pi board and display | Desktop computing, coding, media playback, and general-purpose projects |
| Touchscreen display | MIPI DSI | Flat-flex ribbon cable | Compatible DSI connector with the correct ribbon cable for the Raspberry Pi generation | Kiosks, dashboards, industrial interfaces, and portable control panels |
| Embedded display module | GPIO display interface | GPIO header connection or dedicated interface cable | Display module designed for GPIO communication | Electronics projects with integrated status or control displays |
According to Raspberry Pi Ltd., Raspberry Pi Touch Display 2 has a native resolution of 720 × 1280 pixels. Raspberry Pi 5 connects to the display using a 22-way-to-15-way flat-flex cable, while compatible earlier Raspberry Pi boards use a 15-way-to-15-way ribbon cable. This model-specific connector difference shows that the required cable form is determined by the board generation rather than the display size alone.
According to Raspberry Pi Ltd., Raspberry Pi Touch Display 2 has a native resolution of 720 × 1280 pixels .
For example, a Raspberry Pi 5 connected to an HDMI monitor requires a micro HDMI-to-HDMI cable, whereas the same board connected to Touch Display 2 requires the dedicated DSI ribbon cable specified by Raspberry Pi Ltd. Users planning display accessories for media center use typically evaluate HDMI-connected displays because televisions and computer monitors commonly provide native HDMI inputs, while DSI displays are better suited to integrated touch-based projects.
Raspberry Pi Display Cable Compatibility Factors
Raspberry Pi display cable compatibility depends on matching the Raspberry Pi model, port type, display connector, cable type, and any required adapter. According to Raspberry Pi Ltd., Raspberry Pi 5 uses 22-way MIPI connectors, while earlier Raspberry Pi boards compatible with the official DSI display use 15-way connectors. As a result, a display cable is compatible only when the board connector, display connector, and cable specification match the intended hardware combination.
The checklist below organises the compatibility criteria that should be verified before selecting a Raspberry Pi display cable or adapter.
The checklist below organises the compatibility criteria that should be verified before selecting a Raspberry Pi display cable or adapter. These checks apply specifically to display connections and complement broader display and cable compatibility assessments across other Raspberry Pi accessories.
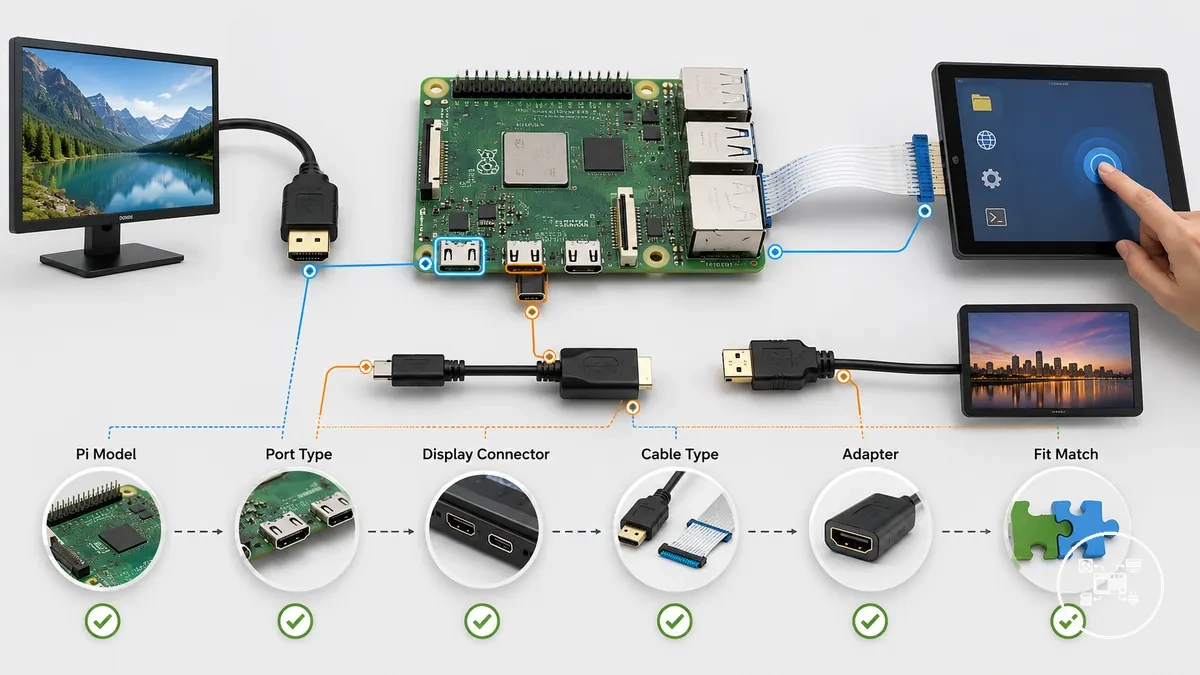
- Raspberry Pi model: Confirm the exact board generation because Raspberry Pi 5 uses 22-way MIPI connectors, whereas earlier compatible boards use 15-way connectors.
- Port type: Verify that the board provides the required interface, such as HDMI, micro HDMI, mini HDMI, or MIPI DSI, specified for the selected display.
- Display connector: Ensure the display connector matches the board directly or through a manufacturer-supported adapter.
- Cable compatibility: Raspberry Pi Ltd. specifies a 22-way-to-15-way flat-flex cable for Raspberry Pi 5 with Touch Display 2, while Raspberry Pi 4 and earlier compatible boards use a 15-way-to-15-way ribbon cable.
- Adapter requirement: Use an adapter only when the hardware documentation explicitly supports the connector conversion.
- Connection condition: Confirm that both the Raspberry Pi firmware and the selected display interface support the intended hardware combination before installation.
For example, according to Raspberry Pi Ltd., Raspberry Pi Touch Display 2 has a native resolution of 720 × 1280 pixels and requires a 22-way-to-15-way ribbon cable when connected to Raspberry Pi 5. In practical terms, replacing that cable with a 15-way-to-15-way ribbon prevents the required physical connection even though the display itself supports Raspberry Pi systems under the correct connector configuration.
Physical installation is also part of compatibility because enclosure dimensions influence cable routing and connector access.
Physical installation is also part of compatibility because enclosure dimensions influence cable routing and connector access. Before selecting an enclosure, verify that it provides sufficient case access for cables so the chosen display cable can be connected without excessive bending or strain.
HDMI, Micro HDMI, and Display Adapter Cable Considerations
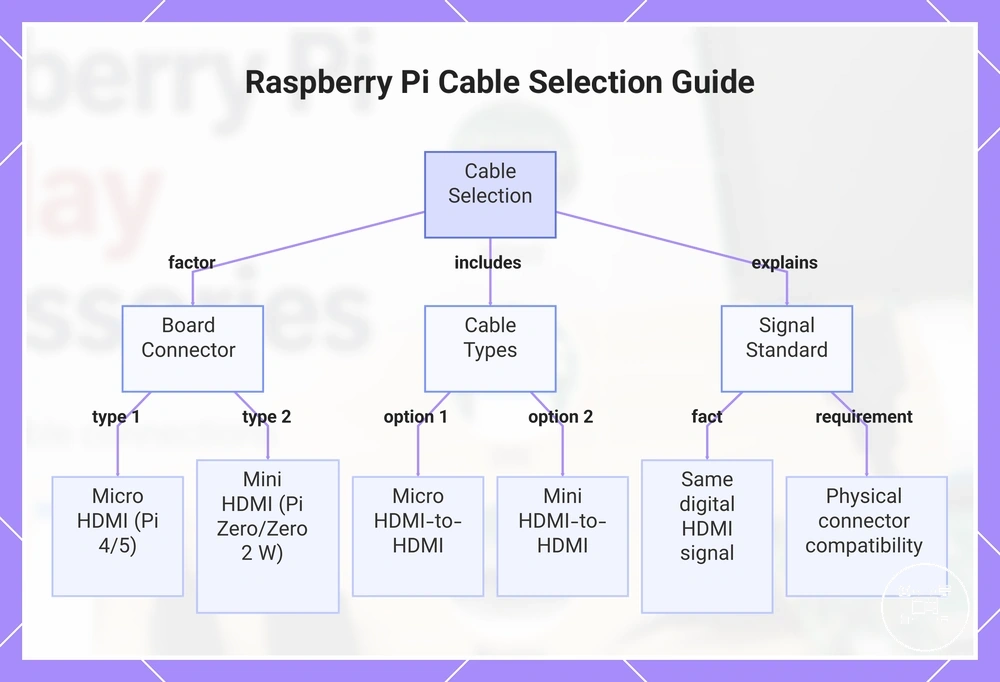
HDMI, micro HDMI, and adapter cable selection is determined by the connector on the Raspberry Pi board and the display input on the connected device. According to Raspberry Pi Ltd., Raspberry Pi 4 Model B and Raspberry Pi 5 provide two micro HDMI output ports, while Raspberry Pi Zero and Raspberry Pi Zero 2 W use a mini HDMI connector. An HDMI cable therefore connects devices with matching full-size HDMI ports, a micro HDMI cable connects Raspberry Pi models with micro HDMI outputs to standard HDMI displays, and an adapter cable is appropriate only when it matches the connector types used by both devices. According to HDMI Licensing Administrator, standard HDMI, mini HDMI, and micro HDMI carry the same digital HDMI signal despite using different connector sizes.
HDMI, micro HDMI, and adapter cable selection is determined by the connector on the Raspberry Pi board and the display input on the connected device.
An HDMI cable differentiates itself by using full-size HDMI connectors at both ends, whereas a micro HDMI cable connects a micro HDMI Raspberry Pi port to a standard HDMI display input, and an adapter cable connects devices that use different connector formats without changing the HDMI signalling standard. For example, according to Raspberry Pi Ltd., a Raspberry Pi 5 connects to a television through a micro HDMI-to-HDMI cable, while a Raspberry Pi Zero 2 W requires a mini HDMI-to-HDMI cable because its board-side connector differs. Selecting the correct cable type preserves physical connector compatibility and allows the Raspberry Pi to establish a video connection with the intended display device under the required port condition.
This chart shows how to choose the correct HDMI cable type based on the Raspberry Pi model and display input connector.
This chart shows how to choose the correct HDMI cable type based on the Raspberry Pi model and display input connector.
Choosing Raspberry Pi Display and Cable Accessories
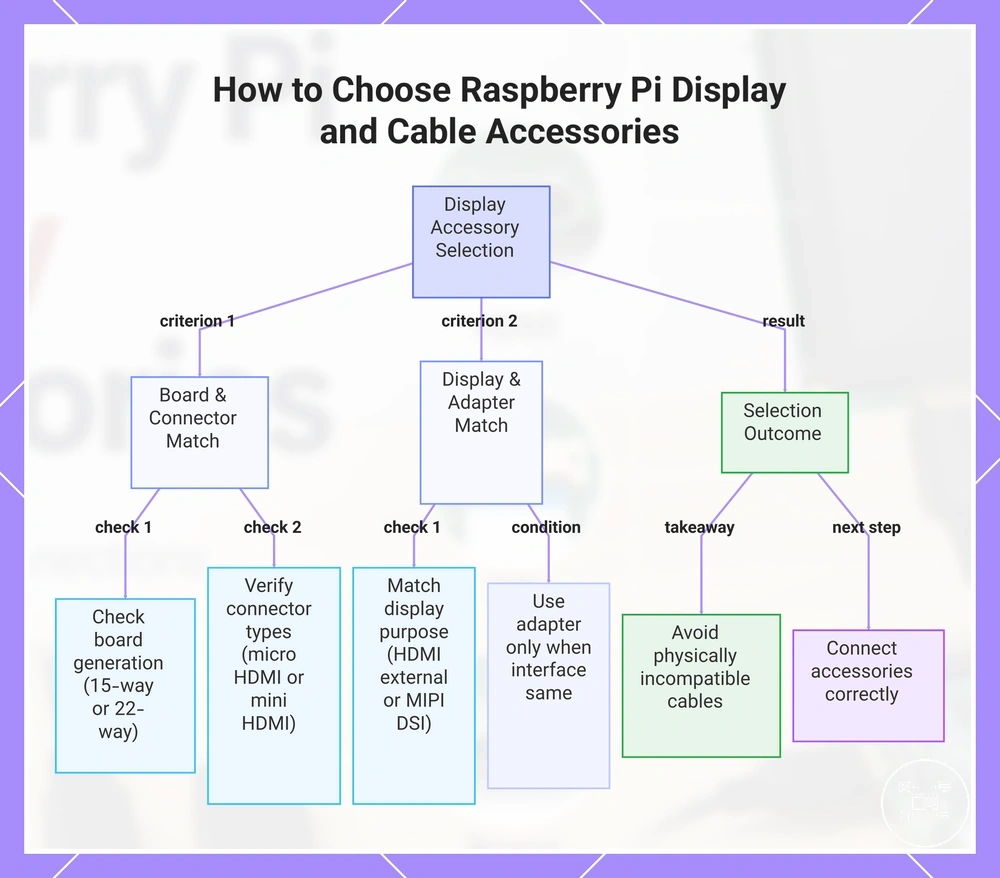
Raspberry Pi display and cable accessories should be selected by evaluating explicit selection criteria that include the Raspberry Pi model, display purpose, connector compatibility, cable length, adapter need, and reliability. According to Raspberry Pi Ltd., Raspberry Pi 5 uses 22-way MIPI display connectors, while earlier Raspberry Pi boards compatible with the official DSI display use 15-way connectors, making board generation the first compatibility criterion before purchasing any display cable or accessory.
The checklist below organises the main decision factors so each accessory can be evaluated against its intended use condition rather than by product ranking or brand preference.
The checklist below organises the main decision factors so each accessory can be evaluated against its intended use condition rather than by product ranking or brand preference.
- Raspberry Pi model: Confirm the exact board because connector layouts differ between generations. Raspberry Pi Ltd. specifies that Raspberry Pi 4 Model B and Raspberry Pi 5 provide dual micro HDMI outputs, while Raspberry Pi Zero and Raspberry Pi Zero 2 W use a mini HDMI connector.
- Display purpose: Match the accessory to its use case. HDMI displays are intended for external monitors and televisions, whereas MIPI DSI displays are designed for compatible integrated touch-display projects, according to Raspberry Pi documentation.
- Connector compatibility: Verify that the board connector, display connector, and cable specification match. Raspberry Pi Ltd. specifies that Touch Display 2 requires a 22-way-to-15-way ribbon cable with Raspberry Pi 5 and a 15-way-to-15-way ribbon cable with earlier compatible boards.
- Cable length: Select a cable that reaches the installation point without excessive tension or unnecessary slack. Raspberry Pi documentation identifies cable compatibility by connector type rather than cable length, so length should be evaluated only after connector compatibility is confirmed.
- Adapter need: Use an adapter only when the Raspberry Pi output connector and the display input use different physical connector formats while supporting the same display interface.
- Reliability: Evaluate connector retention, cable construction, and compliance with the manufacturer's compatibility guidance because secure physical connections reduce the likelihood of intermittent display signal loss.
For example, according to Raspberry Pi Ltd., a Raspberry Pi 5 connected to Touch Display 2 requires a 22-way-to-15-way ribbon cable, whereas the same Raspberry Pi 5 connected to a television requires a micro HDMI-to-HDMI cable. Selecting accessories by matching the Raspberry Pi model, connector specification, and display purpose helps avoid purchasing physically incompatible cables. After choosing compatible accessories, the next step is connecting Raspberry Pi accessories correctly during installation.
After choosing compatible accessories, the next step is connecting Raspberry Pi accessories correctly during installation.
This chart outlines the key selection criteria and the expected outcome for choosing Raspberry Pi display and cable accessories.
Raspberry Pi Display Connection Problems and Common Causes
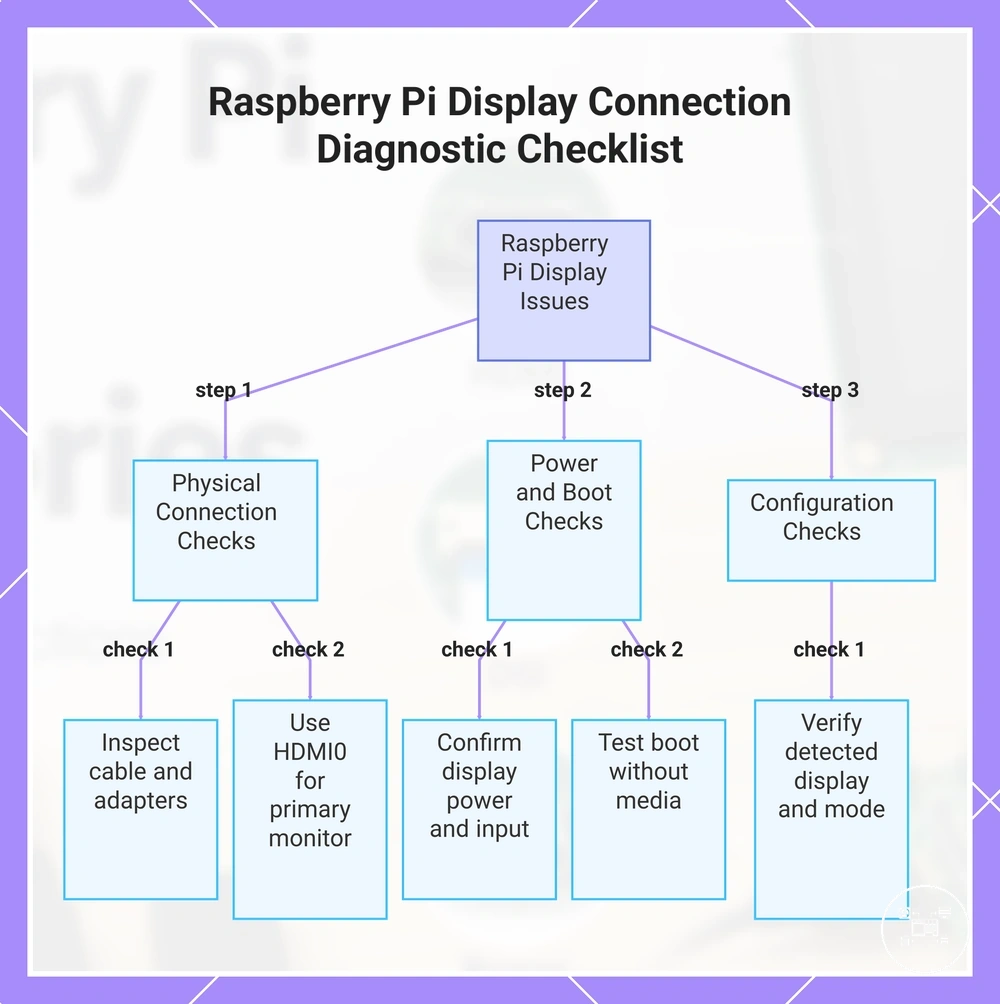
Raspberry Pi display connection problems commonly appear as no display signal, an intermittent image, an incorrect resolution, or a powered screen with no video. The likely cause should be checked across the HDMI connection or micro HDMI connection, cable condition, display power state, Raspberry Pi boot state, and display configuration. Raspberry Pi documentation specifies that a primary monitor should use the port marked HDMI0 when the board has more than one HDMI port, but a blank screen can still result from another physical or software condition.
The diagnostic checklist below organises each symptom by a possible cause and a verification check.
The diagnostic checklist below organises each symptom by a possible cause and a verification check. Complete the physical checks before changing display settings because an unpowered monitor, incorrect input, unsuitable cable, or incomplete boot can produce the same visible symptom as a configuration error.
- No display signal: The display may lack power or may be set to a different input. Confirm the display power state, select the HDMI input connected to the Raspberry Pi, and reconnect both cable ends while the equipment is powered down.
- Blank HDMI display: The HDMI connection may use the wrong board port or cable format. Raspberry Pi Ltd. specifies micro-HDMI-to-HDMI cables for Raspberry Pi 4 Model B, Raspberry Pi 5, Raspberry Pi 400, Raspberry Pi 500, and Raspberry Pi 500+, while Raspberry Pi Zero models require mini-HDMI-to-HDMI cables; boards with two HDMI outputs should use HDMI0 for the primary monitor.
- Intermittent image: A loose connector, damaged cable condition, or unsupported adapter path can interrupt the display signal. Inspect the cable for connector damage or sharp bends, remove nonessential adapters, and test the documented cable type for the Raspberry Pi model.
- Powered screen with no image: The display may be operating while the Raspberry Pi has not completed its boot process. Raspberry Pi documentation states that Raspberry Pi 4 and later flagship models can show bootloader diagnostic information on an HDMI display when powered without boot media, which separates a basic HDMI-output check from an installed operating-system problem.
- Incorrect resolution or unstable output: The active display mode may not match the monitor's reported capabilities or current configuration. Raspberry Pi OS normally selects the highest resolution and refresh rate supported by both devices; verify the detected display and configured mode only after checking power, input selection, cable condition, adapter use, and port choice.
For example, Raspberry Pi Ltd. specifies that Raspberry Pi 4 Model B and Raspberry Pi 5 each provide two micro HDMI ports, labelled HDMI0 and HDMI1 in board documentation. Moving one confirmed micro-HDMI-to-HDMI cable and the same monitor from HDMI1 to HDMI0 tests the port condition while keeping the cable, display, and power variables unchanged. A signal on HDMI0 narrows the issue to the original connection path, while continued failure leaves the cable, monitor input, boot state, or configuration as unresolved variables.
These checks address display-specific symptoms and do not establish one universal cause for every hardware combination.
These checks address display-specific symptoms and do not establish one universal cause for every hardware combination. Storage, USB, operating-system startup, and general power-delivery faults belong to broader display and cable troubleshooting when they affect the display connection outcome.
This chart shows the recommended sequence of checks to diagnose common Raspberry Pi display connection problems, starting with physical checks before configuration changes.
This chart shows the recommended sequence of checks to diagnose common Raspberry Pi display connection problems, starting with physical checks before configuration changes.