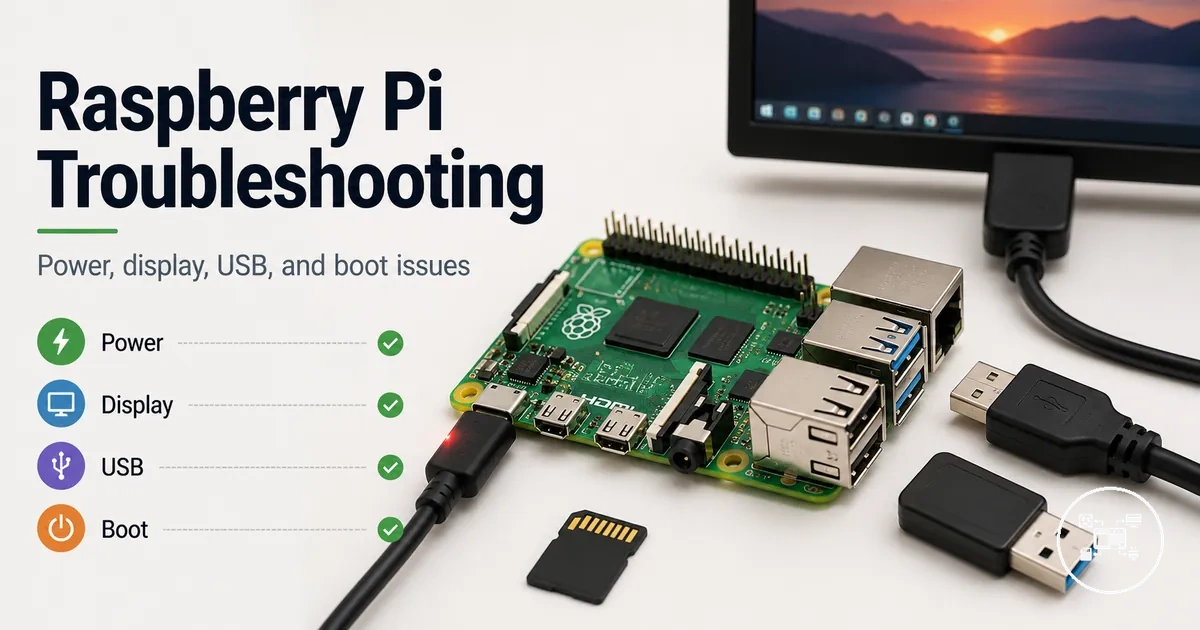
Raspberry Pi Accessories Troubleshooting
Raspberry Pi accessories troubleshooting identifies whether an observed symptom is associated with power, connection, compatibility, configuration, or accessory condition. The diagnostic value is conditional: a symptom narrows the possible causes but does not confirm that an accessory is defective.
The diagnostic value is conditional: a symptom narrows the possible causes but does not confirm that an accessory is defective.
Power, display, USB, boot, and cooling symptoms can overlap because one operating condition can affect multiple connected accessories. Raspberry Pi documentation identifies power supply behaviour, boot media, display connections, USB peripherals, boot diagnostics, and thermal control as separate hardware and operating checks, so diagnosis should match each symptom to the Raspberry Pi model, accessory type, connection path, and setup condition.
Power, display, USB, boot, and cooling symptoms can overlap because one operating condition can affect multiple connected accessories.
Before replacement, check whether the accessory has the required physical fit, port or connector type, power condition, configuration, and reliable connection for the specific Raspberry Pi model. A symptom that disappears after correcting one of those conditions indicates a recoverable setup or compatibility cause; a symptom that remains under a known-compatible condition provides stronger evidence for an accessory fault and routes the diagnosis into the relevant symptom group.
- Power symptoms: Restarting, instability, or a power warning directs the first check toward the supply, cable, connector, and combined accessory load.
- Display symptoms: Missing output or a no-signal state directs diagnosis toward the display input, cable type, adapter, Raspberry Pi port, and signal configuration.
- USB symptoms: Failed recognition, intermittent detection, or reduced peripheral performance directs diagnosis toward the USB port, hub or adapter, connection condition, compatibility, and available power.
- Boot symptoms: A failed startup directs diagnosis toward the SD card or other boot media, card reader or adapter, operating-system image, storage connection, and power condition.
- Cooling symptoms: Unexpected temperature behaviour directs diagnosis toward fan operation, heatsink contact, case airflow, ambient environment, and workload.
Table of Contents
Common Raspberry Pi Accessory Problems and Symptoms
Raspberry Pi accessory problems usually appear as visible symptoms: missing output, failed recognition, instability, a boot issue, overheating, or unexpected peripheral behaviour. Group each symptom by function before assigning a possible cause, because the diagnostic direction may be an accessory fault, connection condition, power limitation, or configuration mismatch.
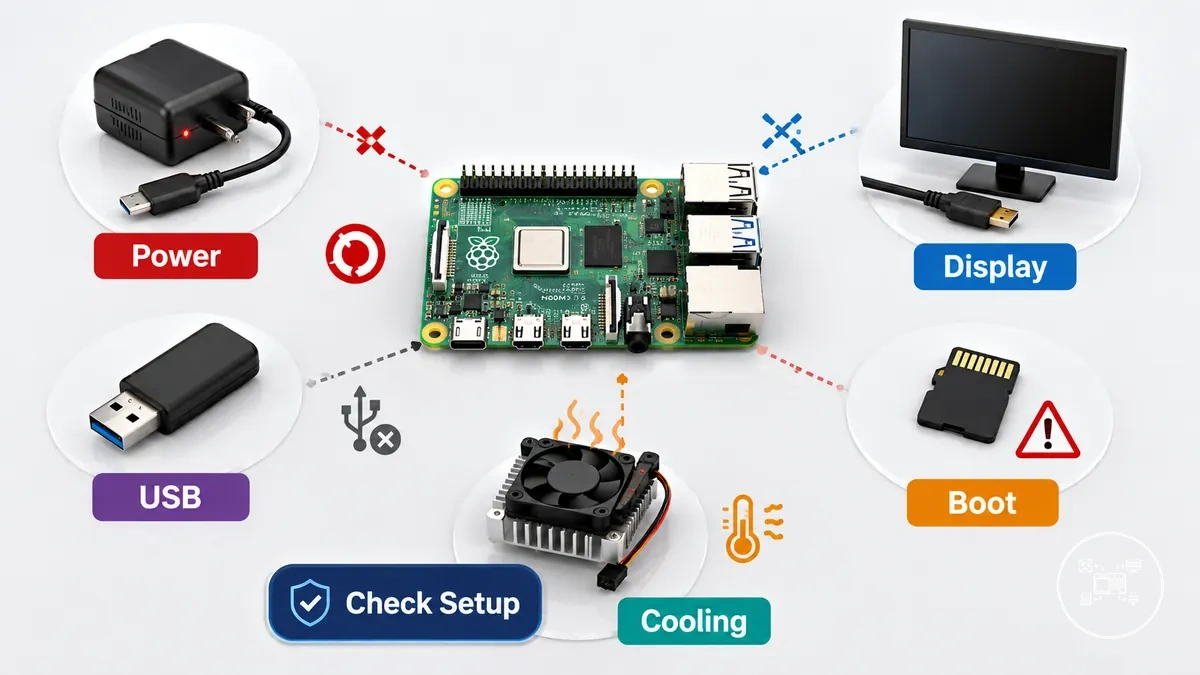
Power, display, USB, boot, and cooling symptoms can overlap when one operating condition affects multiple Raspberry Pi accessories. Raspberry Pi documentation identifies the power supply, display connection, USB peripherals, boot media, and thermal conditions as separate diagnostic areas rather than proof that one accessory is defective. Review the correct setup steps before troubleshooting, including the board model, port, cable, adapter, power source, and configuration. A symptom that disappears after restoring the required setup condition indicates a configuration or connection cause; a symptom that remains under a known-compatible condition provides stronger evidence of an accessory fault.
Power, display, USB, boot, and cooling symptoms can overlap when one operating condition affects multiple Raspberry Pi accessories.
For example, Raspberry Pi specifies that a Raspberry Pi 5 powered at 5 V and 3 A limits connected peripherals to 600 mA, whereas a 5 V and 5 A supply supports the board's higher peripheral-power mode. A USB drive that disconnects under the 600 mA limit therefore creates a power-related diagnostic direction rather than confirming failed USB hardware.
- Power and instability: Unexpected restarts, warning indicators, or accessory disconnections direct diagnosis toward the supply rating, cable condition, connector fit, and combined peripheral load.
- Display and missing output: A blank screen or absent signal directs diagnosis toward the display input, HDMI or micro-HDMI cable, adapter, selected port, and video configuration.
- USB and failed recognition: An undetected or intermittent peripheral directs diagnosis toward the USB port, hub or adapter, available current, compatibility, and physical connection.
- Storage and boot issue: Failed startup or repeated boot behaviour directs diagnosis toward the SD card or other boot media, card reader, adapter, operating-system image, and storage connection.
- Cooling and overheating: Temperature warnings or reduced performance direct diagnosis toward fan operation, heatsink contact, case airflow, ambient conditions, and workload.
- Unexpected accessory behaviour: A feature that differs from its expected state directs diagnosis toward Raspberry Pi model compatibility, physical fit, software configuration, and accessory condition.
Checking Raspberry Pi Accessory Compatibility and Connections
Raspberry Pi accessory compatibility is determined by whether the accessory type matches the correct board model, ports, physical fit, power requirements, and connection condition. An accessory that does not meet one of these compatibility requirements can fail to operate even when the hardware itself is functional, so compatibility and connection checks should be completed before diagnosing an accessory fault.
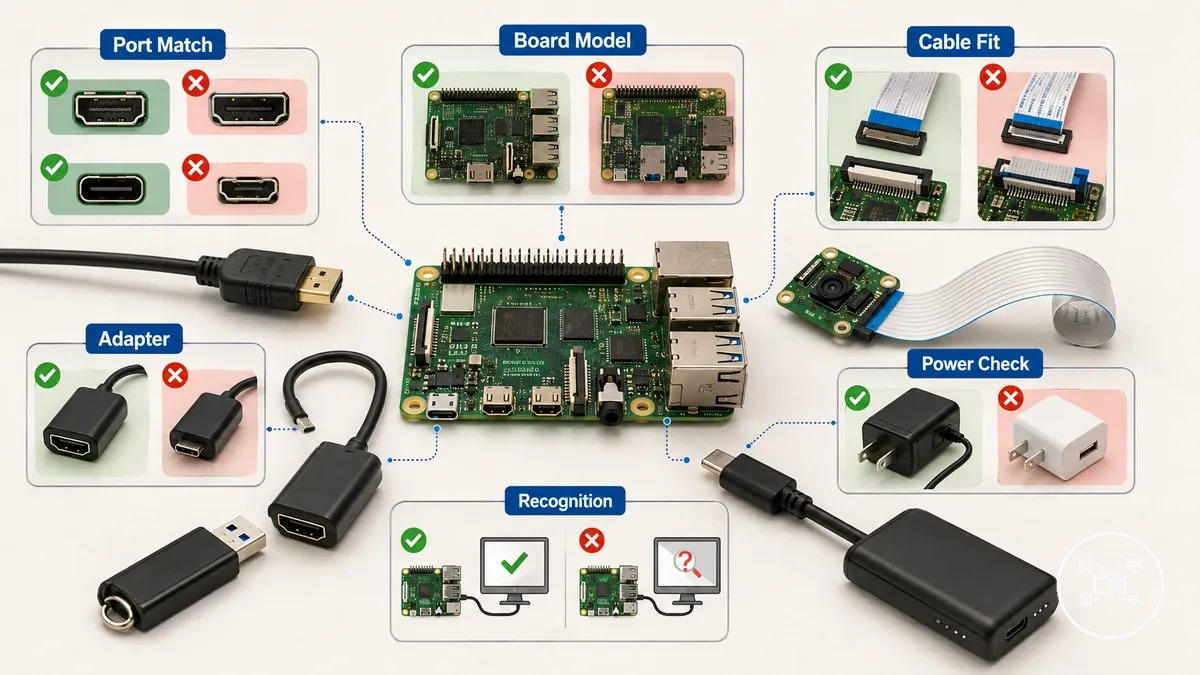
According to Raspberry Pi documentation, Raspberry Pi 5 replaces the previous full-size CSI and DSI connectors with smaller combined MIPI connectors, requiring compatible adapter cables when using many earlier Raspberry Pi Camera Modules and Displays. Raspberry Pi also specifies that accessory operation depends on using the correct connector, cable orientation, supported adapter, available power, and board model rather than physical fit alone. Broader compatibility checks for accessory issues are covered separately, while this section focuses only on troubleshooting-related verification.
Broader compatibility checks for accessory issues are covered separately, while this section focuses only on troubleshooting-related verification.
For example, according to Raspberry Pi, a Raspberry Pi 5 powered by the official 5 V 5 A USB-C power supply can enable its higher USB peripheral power mode, whereas lower-capacity power supplies can reduce the power available to connected accessories. A USB SSD that disconnects under an insufficient power condition therefore indicates a compatibility or power requirement issue rather than confirming that the storage accessory has failed.
A USB SSD that disconnects under an insufficient power condition therefore indicates a compatibility or power requirement issue rather than confirming that the storage accessory has failed.
Verify the following compatibility and connection conditions before investigating specific accessory failures:
- Physical fit: Confirm that the connector shape and accessory type match the intended Raspberry Pi port.
- Board model: Verify that the accessory explicitly supports the Raspberry Pi generation being used.
- Ports and cable: Check that the correct port, cable orientation, and any required adapter are installed securely.
- Power requirements: Confirm that the power supply can provide sufficient power for both the Raspberry Pi and connected accessories under the current operating condition.
- Signal recognition: Verify that Raspberry Pi OS detects the connected accessory after the compatibility and connection checks are complete.
- Setup condition: Recheck every connection after changes to rule out installation errors before concluding that the accessory is defective.
Raspberry Pi Power Issues and Supply Problems
Raspberry Pi power issues occur when unstable power delivery affects the board or connected accessories, producing symptoms such as unexpected reboots, undervoltage warnings, USB disconnections, or intermittent operation. According to Raspberry Pi documentation, Raspberry Pi boards require a regulated 5 V power supply, so diagnosing the power supply, cable, connector, and accessory load should precede replacing an accessory because identical symptoms can originate from power instability rather than hardware failure.
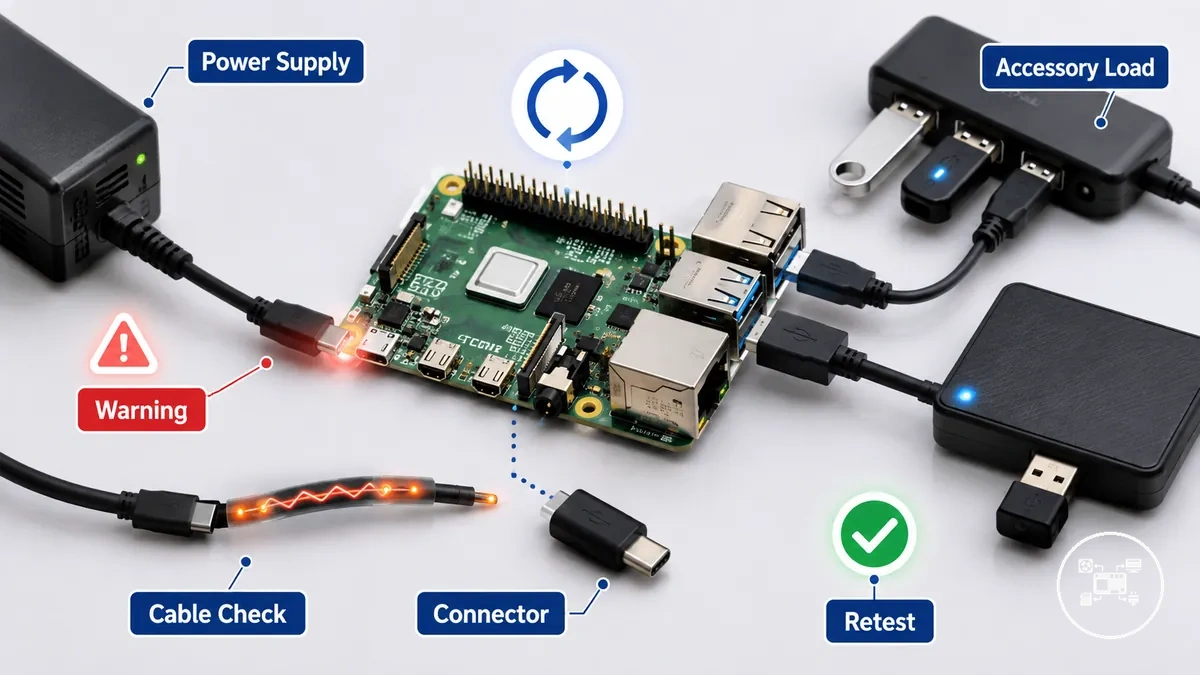
Power instability can result from insufficient current capacity, voltage drop caused by cable resistance, a loose USB-C or micro-USB connector, or an accessory load that exceeds the available power for the connected Raspberry Pi model. Raspberry Pi specifies that Raspberry Pi 5 can provide higher USB peripheral power only when powered by a compatible 5 V 5 A USB-C power supply; lower-capacity supplies reduce the power available to USB peripherals. More detailed information about power accessory problems is covered separately because this section focuses on troubleshooting rather than power selection.
More detailed information about power accessory problems is covered separately because this section focuses on troubleshooting rather than power selection.
For example, according to Raspberry Pi documentation, a Raspberry Pi may display an undervoltage warning or reboot unexpectedly when board voltage falls below the operating threshold because of cable resistance or insufficient power delivery, even if the power adapter's advertised current rating appears adequate. Retesting with a known-compatible power supply and cable helps determine whether the observed symptom follows the power components or remains with the Raspberry Pi and attached accessory, providing a safer diagnostic direction before replacement.
Use the following diagnostic checks before concluding that a power accessory is defective:
- Unexpected reboot: Verify that the power supply provides a stable regulated 5 V output under the current accessory load.
- Undervoltage warning: Inspect the cable and connector for damage, loose connections, or excessive resistance that can reduce delivered voltage.
- USB accessory disconnects: Check whether connected peripherals exceed the available USB power for the Raspberry Pi model and power configuration.
- Intermittent startup: Retest with a known-compatible power supply and cable to determine whether the symptom follows the power path.
- Random instability: Disconnect non-essential accessories and reconnect them individually to identify whether total accessory load contributes to the power issue.
- Persistent symptoms: If the same behaviour remains after confirming compatible power components, continue diagnosing the Raspberry Pi board or the affected accessory because identical symptoms can have non-power-related causes.
Raspberry Pi Display and Cable Connection Issues
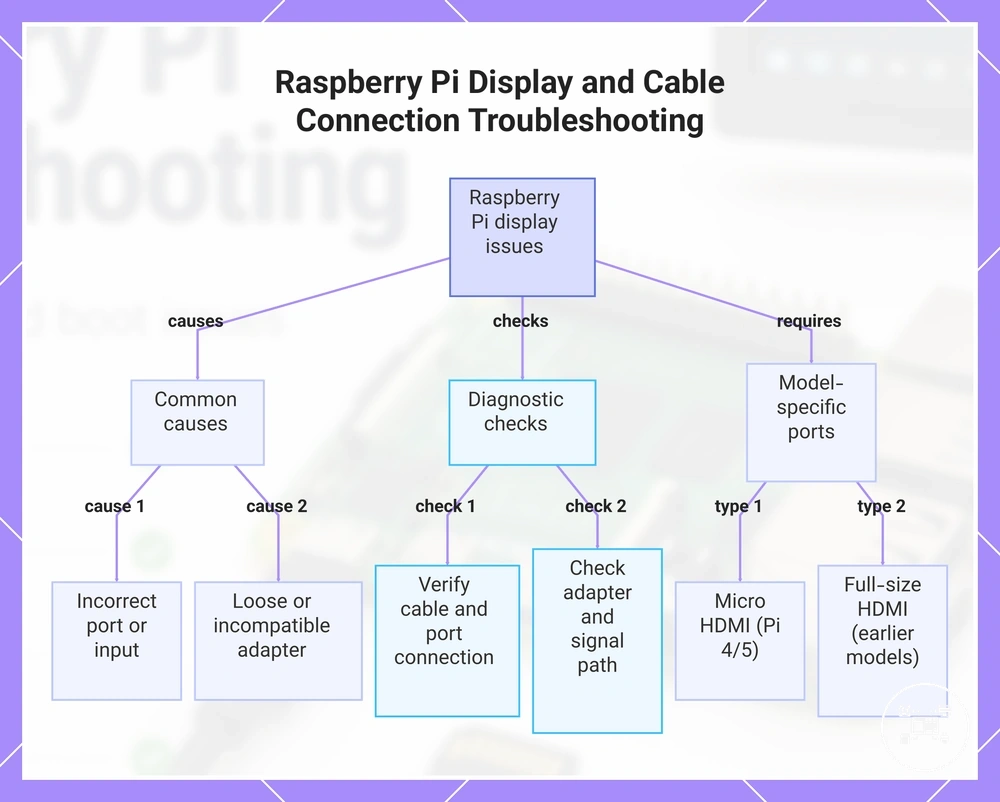
Raspberry Pi display and cable connection issues should be diagnosed by checking the complete signal path, HDMI or micro HDMI port, cable connection, adapter compatibility, and display input before replacing any display accessory. According to Raspberry Pi documentation, Raspberry Pi 4 and Raspberry Pi 5 use two micro HDMI output ports, while earlier models commonly use a full-size HDMI connector, making connector compatibility a model-specific requirement. If restoring the correct signal path resolves the missing output, the symptom indicates a connection or compatibility condition rather than confirmed hardware failure.
If restoring the correct signal path resolves the missing output, the symptom indicates a connection or compatibility condition rather than confirmed hardware failure.
Display issues commonly result from an incorrect HDMI port, an incompatible cable or adapter, the wrong display input, a loose connector, or an interrupted signal path. Raspberry Pi documentation specifies that Raspberry Pi 4 and Raspberry Pi 5 require a compatible micro HDMI cable or adapter, and the connected monitor must be switched to the corresponding HDMI input before a video signal can appear. Broader information about display and cable issues explains display accessories and connection options, while this section focuses only on troubleshooting display symptoms and cable-related diagnostics.
Replacing the loose adapter with a properly fitted micro HDMI connection restores the video signal without requiring the display or cable to be replaced.
For example, according to Raspberry Pi documentation, connecting a Raspberry Pi 4 to a monitor with a full-size HDMI cable through a loose micro HDMI adapter can produce a "No Signal" screen even though the Raspberry Pi and monitor both operate correctly. Replacing the loose adapter with a properly fitted micro HDMI connection restores the video signal without requiring the display or cable to be replaced.
Use the following diagnostic checks before replacing a display accessory or cable:
- Missing output: Verify that the HDMI or micro HDMI cable is connected to the correct Raspberry Pi video port and that the monitor is using the matching HDMI input.
- Blank screen after startup: Check cable connection, connector fit, adapter compatibility, and signal path before assuming a display fault.
- Intermittent signal: Inspect the HDMI cable and connectors for physical damage, poor contact, or movement that interrupts video transmission.
- Display works on another monitor: Continue diagnosis with the original monitor, selected input, or cable path because the Raspberry Pi video output is less likely to be the cause.
- Signal returns after reconnecting: A restored display indicates a cable connection or compatibility issue rather than confirming that the display accessory itself was defective.
This chart shows the common causes and diagnostic checks for Raspberry Pi display issues, including model-specific port requirements.
Raspberry Pi USB Accessory and Peripheral Issues
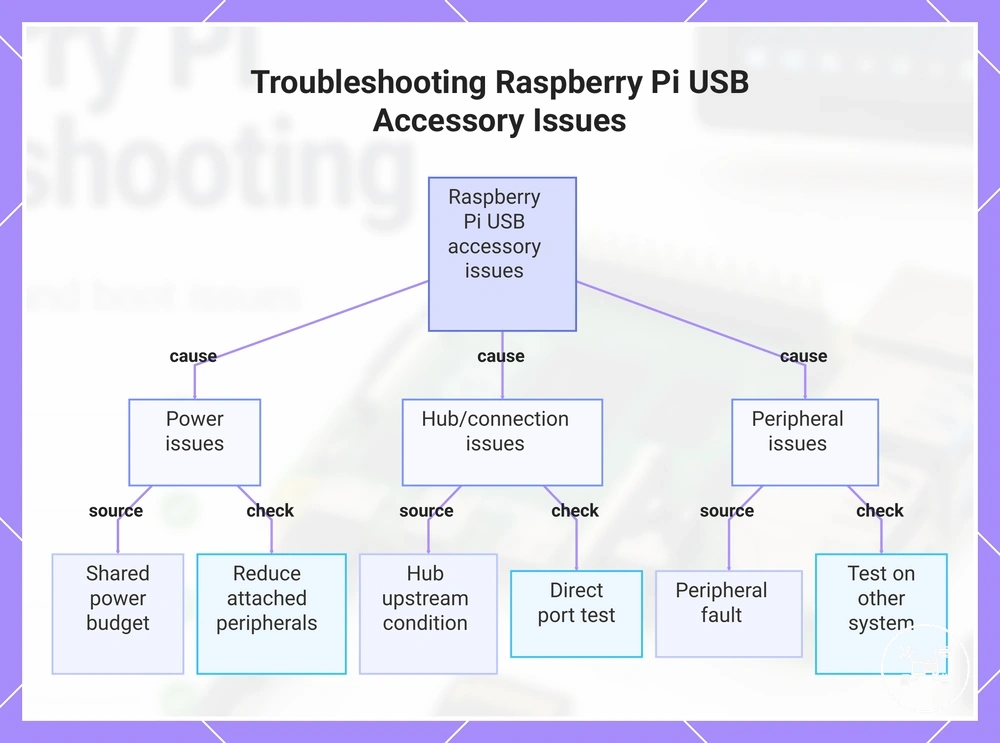
Raspberry Pi USB accessory issues can result from recognition failure, an unsuitable port or connection, insufficient power, a hub or adapter condition, or the peripheral itself. A USB device that is not detected, disconnects intermittently, or shows reduced performance should therefore be tested under controlled connection and power conditions before it is treated as defective.
USB accessory recognition depends on a secure port connection, compatible operation, sufficient available power, and reliable hub or adapter behaviour.
USB accessory recognition depends on a secure port connection, compatible operation, sufficient available power, and reliable hub or adapter behaviour. Raspberry Pi documentation specifies that its USB 3 Hub can draw up to 900 mA at 5 V when bus-powered, with that 4.5 W power budget shared across four downstream ports. A peripheral that works on a direct port but fails through the bus-powered hub therefore points toward shared power, the upstream connection, or the adapter path rather than confirmed accessory failure.
Raspberry Pi documentation specifies that its USB 3 Hub can draw up to 900 mA at 5 V when bus-powered, with that 4.5 W power budget shared across four downstream ports.
For example, four peripherals connected through that bus-powered hub share the same 900 mA upstream allowance rather than receiving 900 mA each, according to Raspberry Pi documentation. If intermittent detection stops after higher-load devices are disconnected, the changed outcome identifies accessory load as the troubleshooting direction; if the symptom remains on a direct connection, continue checking the peripheral, cable, port, and compatibility condition.
For example, four peripherals connected through that bus-powered hub share the same 900 mA upstream allowance rather than receiving 900 mA each, according to Raspberry Pi documentation.
Use the following checks to separate recognition failure, unstable performance, and connection conditions:
- No detection: Connect the USB accessory directly to another suitable port; recognition there directs diagnosis toward the original port, hub, adapter, or connection path.
- Intermittent recognition: Reseat the connector and inspect the cable or adapter; stable detection after reconnection indicates a physical connection condition.
- Disconnects under load: Reduce the number of attached peripherals; improved stability indicates that the shared USB power budget contributed to the symptom.
- Works without the hub: Check the hub's upstream connection, power condition, and compatibility because the peripheral has demonstrated direct-port operation.
- Detected with reduced performance: Compare direct and adapted connections; better performance on the direct port identifies the hub, adapter, cable, or negotiated connection as the next diagnostic area.
- No change across ports: Test the USB accessory on another compatible system; failure under both conditions provides stronger evidence of an accessory or cable fault.
This chart shows the common causes of USB accessory issues on Raspberry Pi and the key diagnostic checks to isolate the problem.
Raspberry Pi Storage and Boot Problems
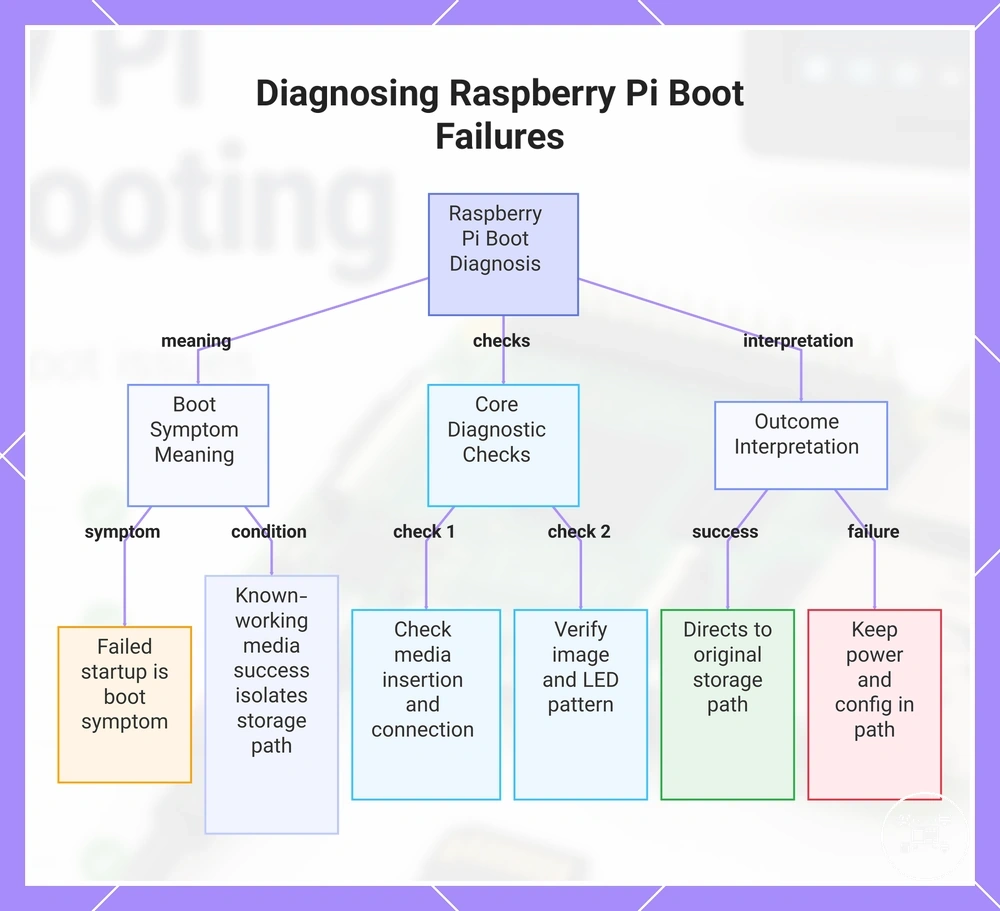
Raspberry Pi storage and boot problems can originate from the SD card, card reader, adapter, boot media connection, operating-system image, power delivery, or startup configuration. A failed startup is therefore a boot symptom, not confirmation that the storage accessory is defective. If known-working boot media starts under the same power and configuration conditions, the original storage path becomes the primary diagnostic path.
Broader storage and boot accessory issues are covered separately from this startup diagnosis.
Raspberry Pi documentation defines boot media as non-volatile storage containing an operating-system image and identifies the microSD card as the most common type; supported models can also start from USB mass storage, network boot, or NVMe storage. For an SD card boot issue, confirm that Raspberry Pi Imager wrote the intended image, the card is fully inserted, and the card reader or adapter provides a reliable connection. File access on another computer confirms that the media is readable, but it does not confirm that the image, partition structure, or boot configuration is valid for the board model. Broader storage and boot accessory issues are covered separately from this startup diagnosis.
For an SD card boot issue, confirm that Raspberry Pi Imager wrote the intended image, the card is fully inserted, and the card reader or adapter provides a reliable connection.
Storage checks overlap with power and configuration checks because interrupted power can stop startup or storage activity, while the configured boot order can prevent otherwise valid boot media from being selected. Raspberry Pi documentation states that supported boards provide model-specific activity-LED patterns or on-screen boot diagnostics for startup failures, so compare the observed pattern with the documentation for the exact model. Retest under the same setup condition with known-working boot media and a known-working reader; a changed outcome points toward the original SD card, image, adapter, reader, or connection, while an unchanged outcome keeps power and configuration in the diagnostic path.
- No startup activity: Confirm that the SD card or other boot media is fully inserted and contains an operating-system image supported by the Raspberry Pi model.
- Boot media not detected: Reseat the media and inspect the slot, card reader, adapter, or USB connection; detection after reseating identifies a connection condition.
- Repeated startup failure: Verify the image-writing result and read the media through another card reader; a read or verification error directs diagnosis toward the card, image, reader, or adapter.
- Startup stops consistently: Compare the activity-LED pattern or displayed boot diagnostic with Raspberry Pi documentation to identify the stage at which boot media access fails.
- Starts with known-working media: The successful comparison directs diagnosis toward the original SD card, operating-system image, reader, adapter, or media connection.
- Fails with known-working media: Continue checking power delivery, boot order, and board configuration because the unchanged outcome does not isolate the storage accessory as the cause.
This chart outlines the diagnostic logic for Raspberry Pi boot failures, including the meaning of boot symptoms, essential checks, and outcome interpretation.
Raspberry Pi Overheating and Cooling Accessory Problems
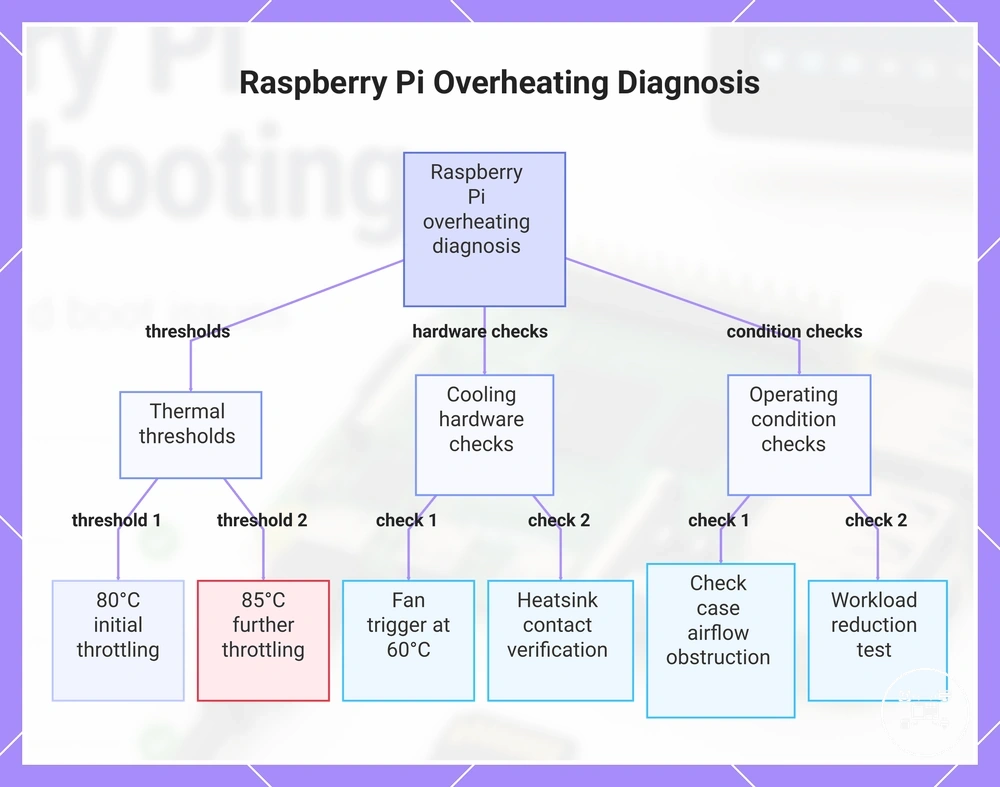
Raspberry Pi overheating should be diagnosed by checking workload, environment, case airflow, and cooling accessory condition together rather than treating a high temperature as proof of fan or heatsink failure. Raspberry Pi documentation states that Raspberry Pi boards begin processor throttling at 80 °C and apply further throttling at 85 °C, so a temperature near either threshold requires a thermal diagnostic check. If temperature falls after reducing workload or improving airflow, the symptom points away from a confirmed cooling accessory fault.
Broader cooling and overheating issues cover cooling accessory characteristics, while this section focuses on diagnosis.
Cooling performance depends on whether the fan operates at its intended trigger points, the heatsink maintains contact with the processor, the case vents remain unobstructed, and the ambient environment permits heat to escape. Raspberry Pi specifies that the Raspberry Pi 5 Active Cooler and case fan start at 60 °C, increase speed at 67.5 °C, and reach full speed at 75 °C under the default firmware-controlled profile. Dust, blocked vents, poor heatsink contact, or a disconnected fan can therefore raise temperature, but sustained workload or a hot enclosure can produce the same thermal symptom while the cooling accessory remains functional. Broader cooling and overheating issues cover cooling accessory characteristics, while this section focuses on diagnosis.
Raspberry Pi specifies that the Raspberry Pi 5 Active Cooler and case fan start at 60 °C, increase speed at 67.5 °C, and reach full speed at 75 °C under the default firmware-controlled profile.
For example, a Raspberry Pi 5 that reaches 75 °C while its firmware-managed fan remains at full speed has passed the final default fan trigger specified by Raspberry Pi; the next corrective direction is to inspect heatsink contact, case airflow, dust, workload, and ambient temperature rather than assuming that fan speed alone is insufficient. If the temperature falls below 75 °C after opening blocked vents or reducing the workload, the changed outcome identifies an airflow or operating-condition contribution rather than proving accessory failure.
If the temperature falls below 75 °C after opening blocked vents or reducing the workload, the changed outcome identifies an airflow or operating-condition contribution rather than proving accessory failure.
Use the following checks to connect each thermal symptom with a diagnostic direction:
- Temperature reaches 80 °C: Confirm fan operation, airflow, heatsink contact, workload, and ambient conditions because Raspberry Pi identifies 80 °C as the initial processor-throttling threshold.
- Temperature approaches 85 °C: Stop non-essential workload and inspect the cooling path because Raspberry Pi applies further throttling at 85 °C.
- Fan does not start at 60 °C on Raspberry Pi 5: Check the fan connector, obstruction, firmware-controlled profile, and accessory condition because 60 °C is the documented default starting point for the Raspberry Pi 5 Active Cooler and case fan.
- High temperature with a heatsink fitted: Verify that the heatsink sits firmly on the intended components and that the thermal interface material maintains full contact.
- Temperature rises inside the case: Inspect blocked vents, dust accumulation, cable placement, and enclosure airflow; a lower temperature with the case opened indicates an airflow restriction.
- Temperature rises only under sustained workload: Reduce the workload under the same environmental conditions; a measurable decrease identifies processing demand as part of the thermal condition.
- Overheating persists after cooling checks: Continue diagnosis with ambient environment, case design, workload, power condition, and board operation because an unchanged result does not isolate the cooling accessory as the cause.
This chart shows the main diagnostic checks for Raspberry Pi overheating, organized by thermal thresholds, cooling hardware checks, and operating condition factors.
Diagnosing Faulty Accessories Before Replacement
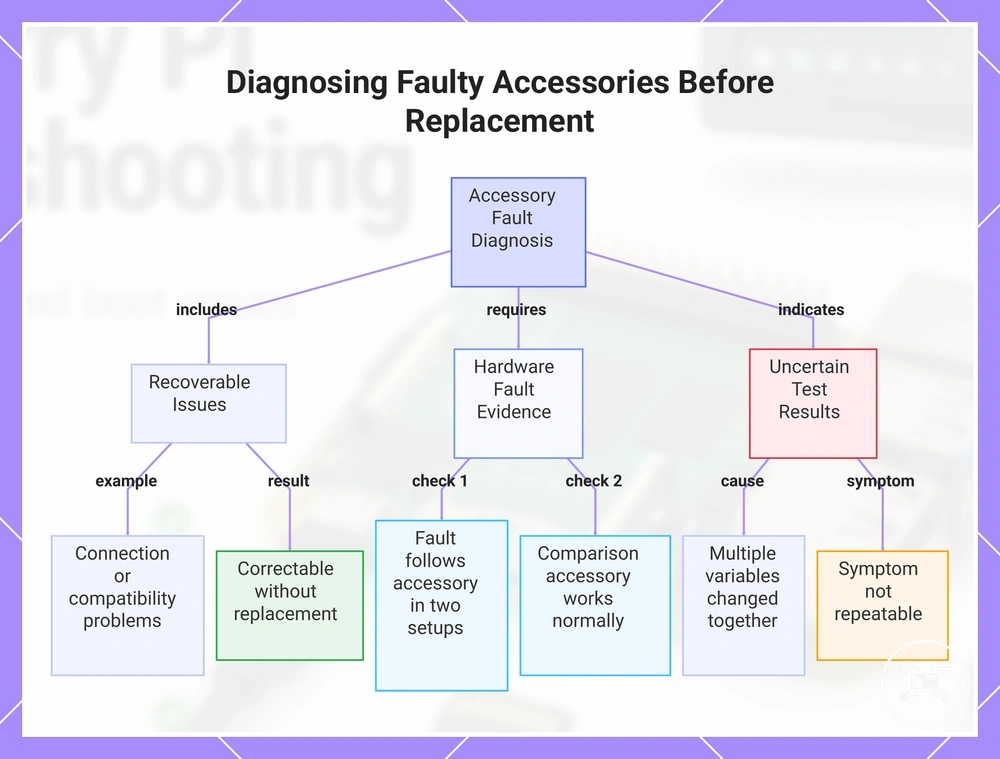
A faulty accessory should be replaced only after diagnosis shows that the same symptom follows the accessory under known-compatible power, connection, configuration, and operating conditions. One failed test does not establish a hardware fault because a recoverable issue can create the same result. The replacement decision therefore requires repeatable evidence that isolates the accessory from the Raspberry Pi setup.
One failed test does not establish a hardware fault because a recoverable issue can create the same result.
Retest the accessory after restoring its required connection, power, compatibility, and setup conditions, then change only one variable at a time. Compare the result with a known-compatible cable, adapter, port, power source, or accessory while keeping the Raspberry Pi model and configuration unchanged. If the symptom disappears after one supporting condition changes, the test result points to that condition rather than the accessory. If the symptom repeatedly follows the accessory while the comparison part works under the same conditions, the evidence supports a hardware-fault diagnosis.
If the symptom disappears after one supporting condition changes, the test result points to that condition rather than the accessory.
A recoverable issue includes a loose connection, incompatible adapter, insufficient power, unsupported configuration, incorrect fit, or installation condition that can be corrected without replacing the accessory. An uncertain result occurs when several variables change together or the symptom cannot be repeated, so the cause remains unisolated. A likely hardware fault exists when the accessory fails in two known-compatible test conditions and a comparison accessory operates normally in both.
An uncertain result occurs when several variables change together or the symptom cannot be repeated, so the cause remains unisolated.
Use these decision checks before treating an accessory fault as confirmed:
- Recoverable connection condition: Reseat the accessory and retest it in the correct port; normal operation after reconnection supports a recoverable issue.
- Recoverable compatibility condition: Substitute one known-compatible cable, adapter, or interface; disappearance of the symptom directs the diagnosis toward the original supporting component.
- Uncertain test result: Repeat the test while changing only one condition; inconsistent or non-repeatable behaviour does not isolate a faulty accessory.
- Accessory-specific result: Test the accessory in a second known-compatible setup; the same repeated symptom strengthens the evidence that the fault follows the accessory.
- Comparison result: Test a known-compatible accessory under the original conditions; successful operation leaves the original accessory as the principal remaining variable.
- Likely replacement condition: Consider replacement when the symptom follows the accessory across two compatible conditions and the comparison accessory works under both.
This chart shows how to determine whether an accessory fault is a recoverable issue or a hardware fault requiring replacement.
Replacing Raspberry Pi Accessories That Cannot Be Recovered
Replacing accessories is appropriate only when troubleshooting leaves a confirmed fault or an unresolved problem that consistently follows the accessory under known-compatible conditions. The replacement decision should be based on the failed accessory role, the diagnostic result, and the expected improvement rather than on one symptom. Once replacement is justified, compatibility requirements become the primary filter.
Once replacement is justified, compatibility requirements become the primary filter.
The replacement attribute must match the Raspberry Pi board model, port or connector, power requirement, physical fit, operating condition, and intended accessory role. The expected improvement should be limited to the function isolated by diagnosis; replacing a failed display cable may restore the signal path, but it does not address an unrelated power or configuration condition. A replacement part is therefore suitable only when it satisfies the verified compatibility condition and restores the affected function without creating a new connection or power mismatch.
Repair is the better next step when the isolated fault affects a safely serviceable part and the accessory can be retested after repair.
Repair is the better next step when the isolated fault affects a safely serviceable part and the accessory can be retested after repair. Reuse is reasonable when the accessory remains reliable in another compatible role and the original fault condition does not apply there. Replacement is the stronger choice when the confirmed fault remains after repeat testing and the accessory cannot perform its intended role reliably.
Reuse is reasonable when the accessory remains reliable in another compatible role and the original fault condition does not apply there.
Use these decision signals after diagnosis has established that repair, reuse, or replacement is required:
- Confirmed fault: Replace the accessory when the same failure follows it across known-compatible conditions and a comparison accessory works under those conditions.
- Compatibility requirement: Match the replacement to the board model, port, connector, power condition, physical fit, and intended accessory role.
- Expected improvement: Define the required outcome as restoration of the isolated function, such as signal output, device detection, boot access, power delivery, or cooling operation.
- Repair condition: Choose repair when the faulty part is identifiable, safely serviceable, and capable of being verified through a repeat test.
- Reuse condition: Reuse the accessory only when testing confirms reliable operation in the proposed compatible role and the original fault is not relevant to that role.
- Unresolved condition: Continue diagnosis when the same symptom remains with a compatible replacement because another component or setup condition remains in the fault path.